

Ringba integration
Connect Ringba with Skro to associate inbound calls and conversion events with the campaigns that generated them.
How do I track Ringba calls?
In this guide you’ll learn how to track Ringba calls as conversions in Skro. Just follow the steps below to start tracking your Ringba calls.
Step 1. Create a number pool in Ringba
If you already have a number pool you want to use, you can skip this step.
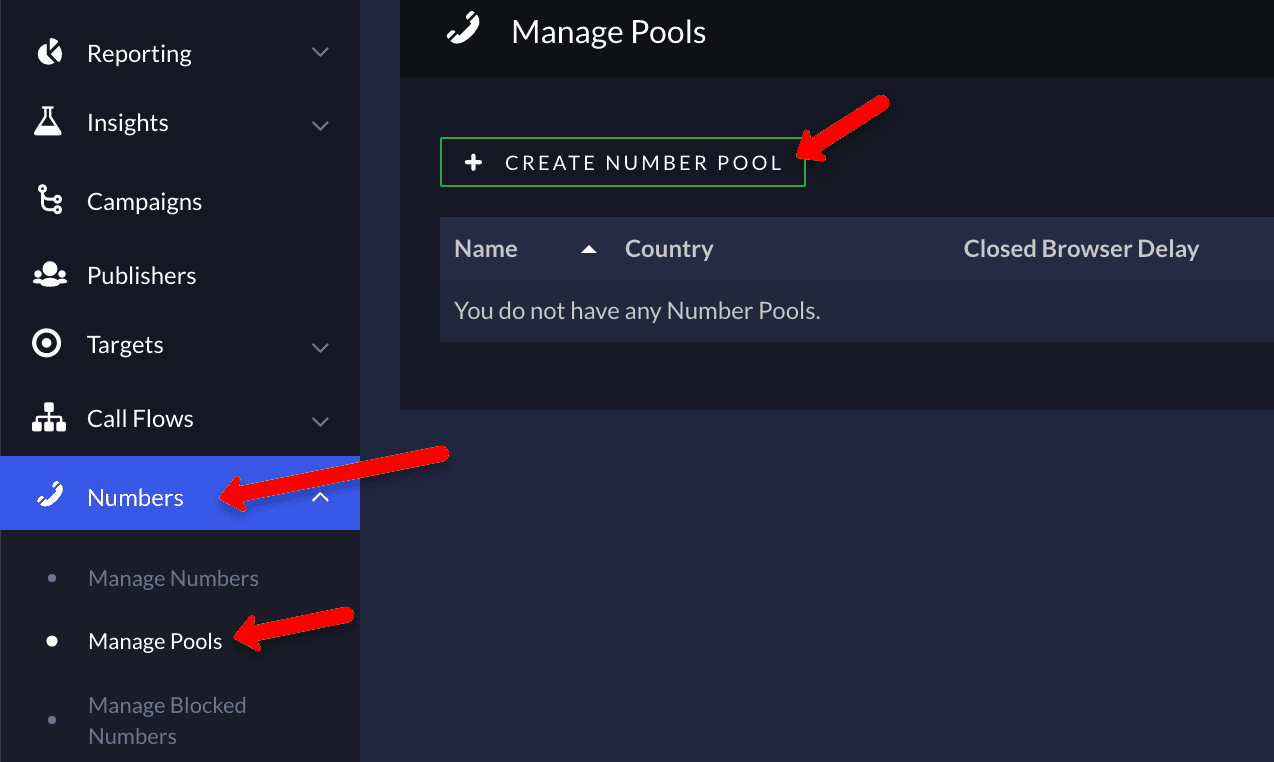
- Go to Numbers → Manage Pools → Create Number Pool.
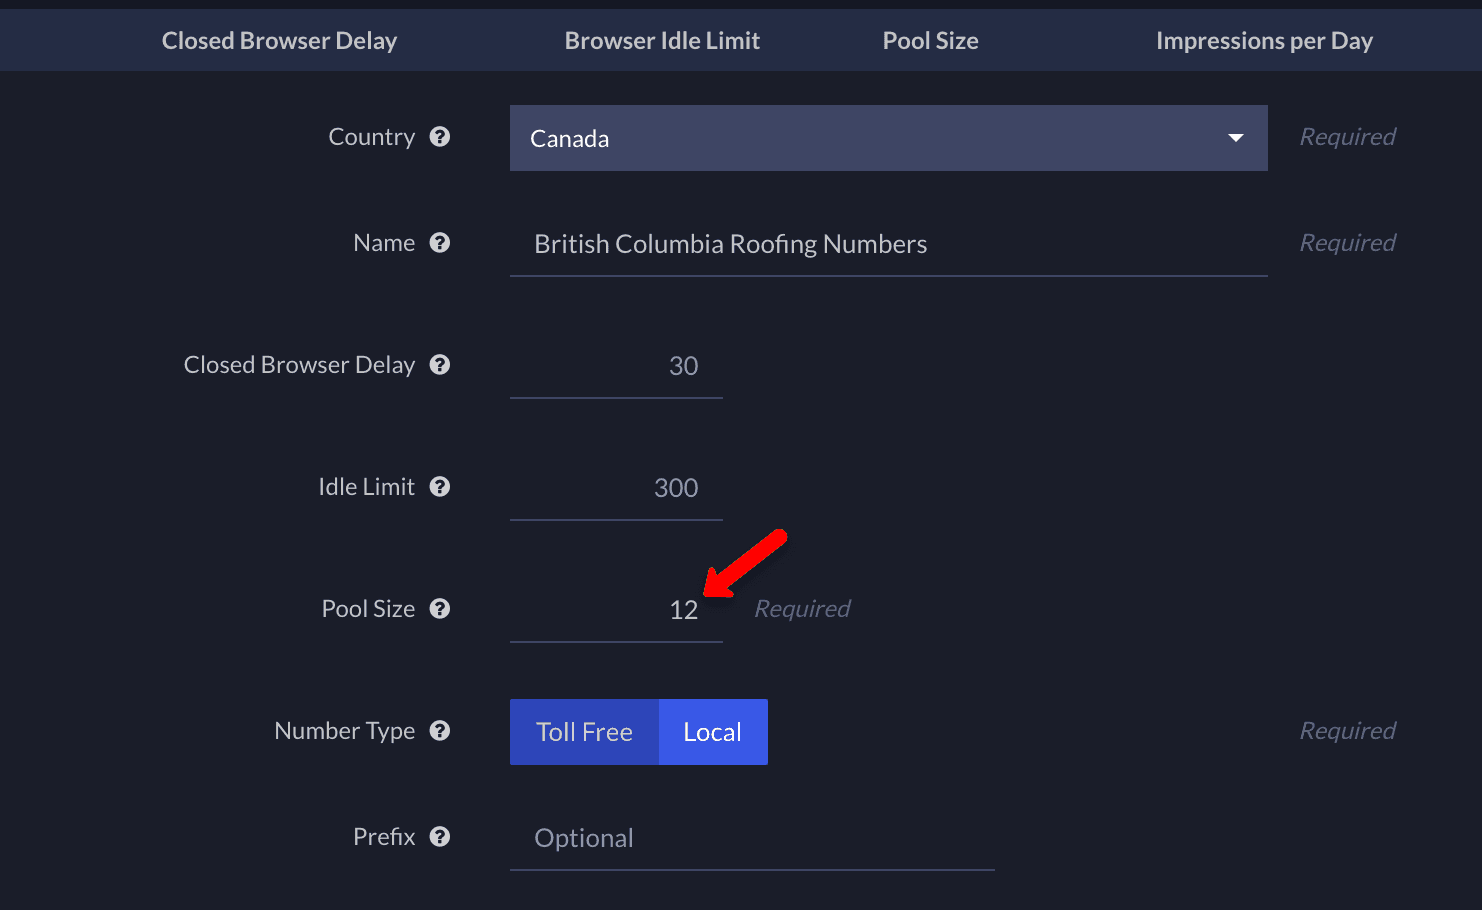
- Then, add in the details for your number pool. If you’re getting a lot of traffic to your page at the same time, you’ll want to have a higher Pool Size. This is so that each visitor can see a different number and Ringba will be able to track which visitor called which number.
Step 2. Create a new campaign in Ringba
If you already have a campaign you want to track, you can skip this step.
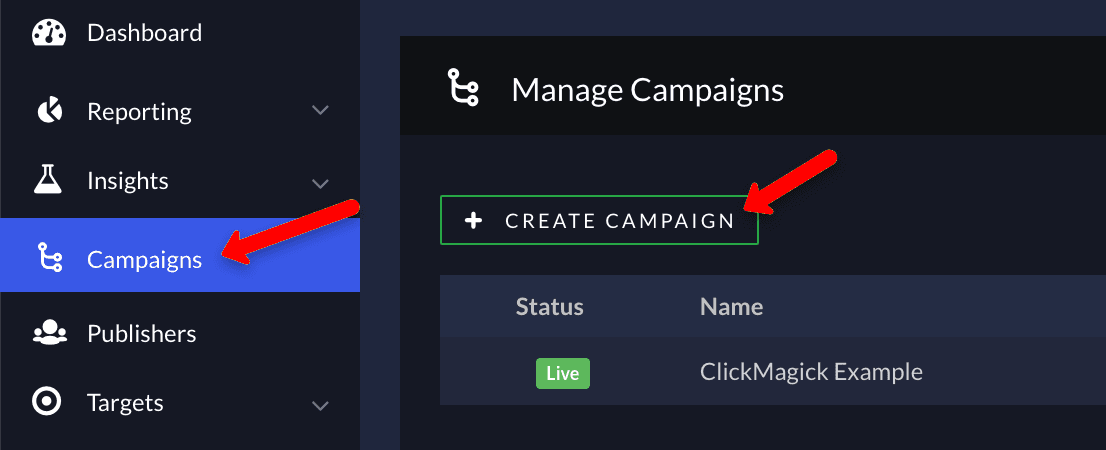
- Go to Campaigns → Create Campaign.
Step 3. Create a call tracking tag and associate it with your publisher number
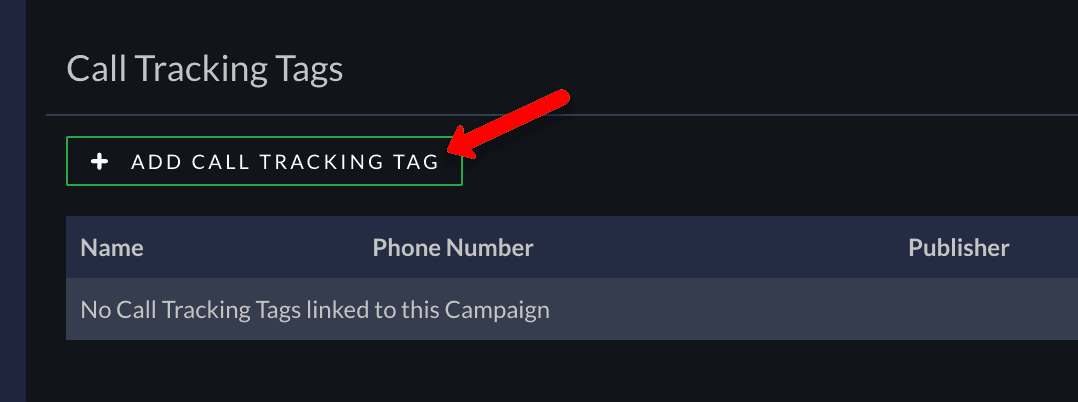
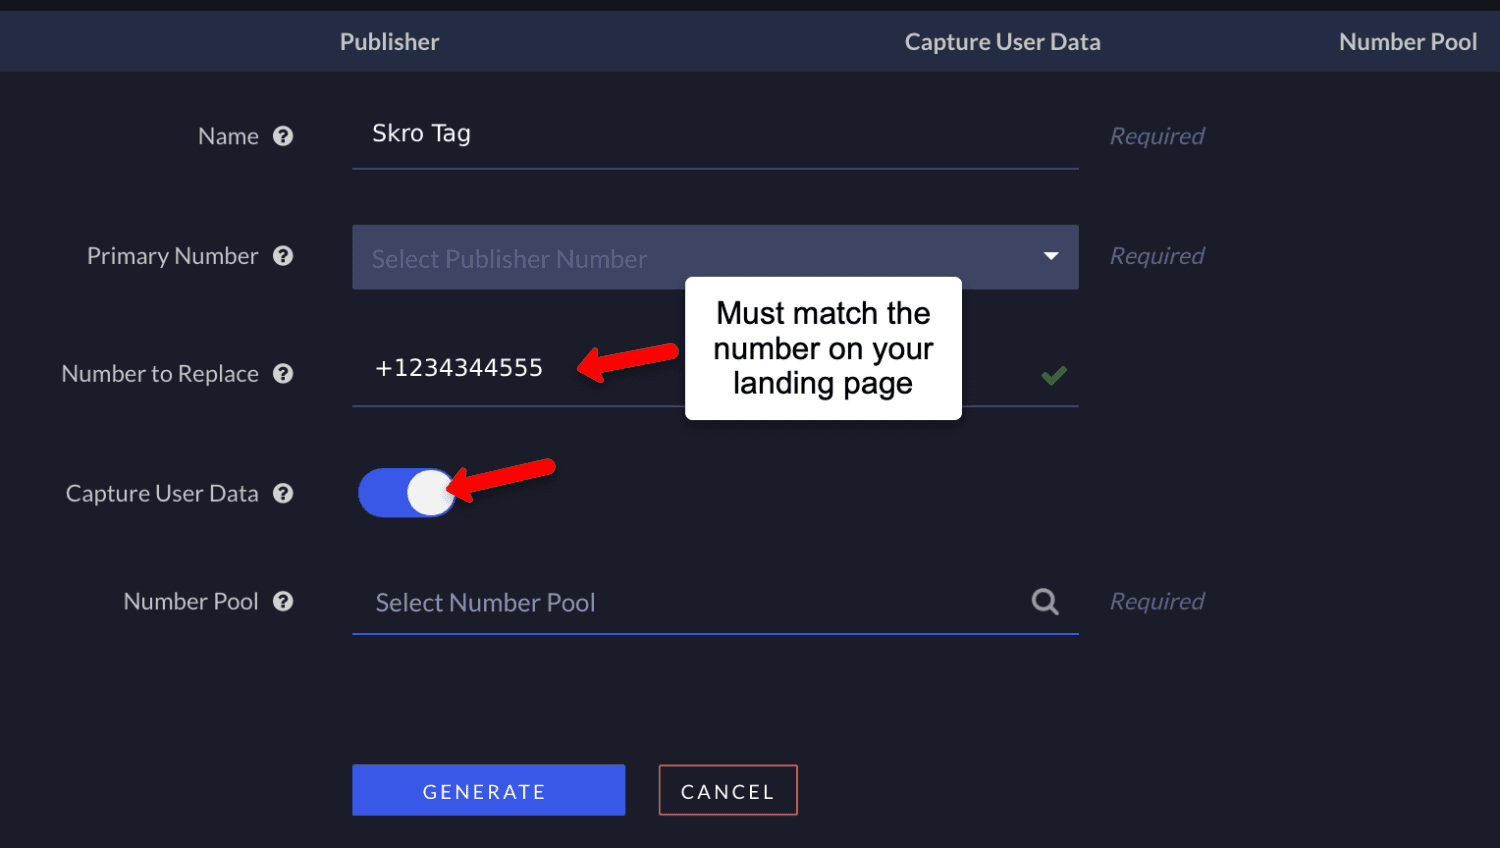
Fill out all the details for your new campaign, then scroll down to Call Tracking Tags and click Add Call Tracking Tag.
-
Give it a Name.
-
Select the Primary Number you want this to be associated with.
-
Switch on Capture User Data.
-
Select the Number Pool you created earlier.
The Number to Replace must match the phone number on your landing page, so it can be replaced with a different pool number for each visitor on your page. It is best if this matches the Primary Number.
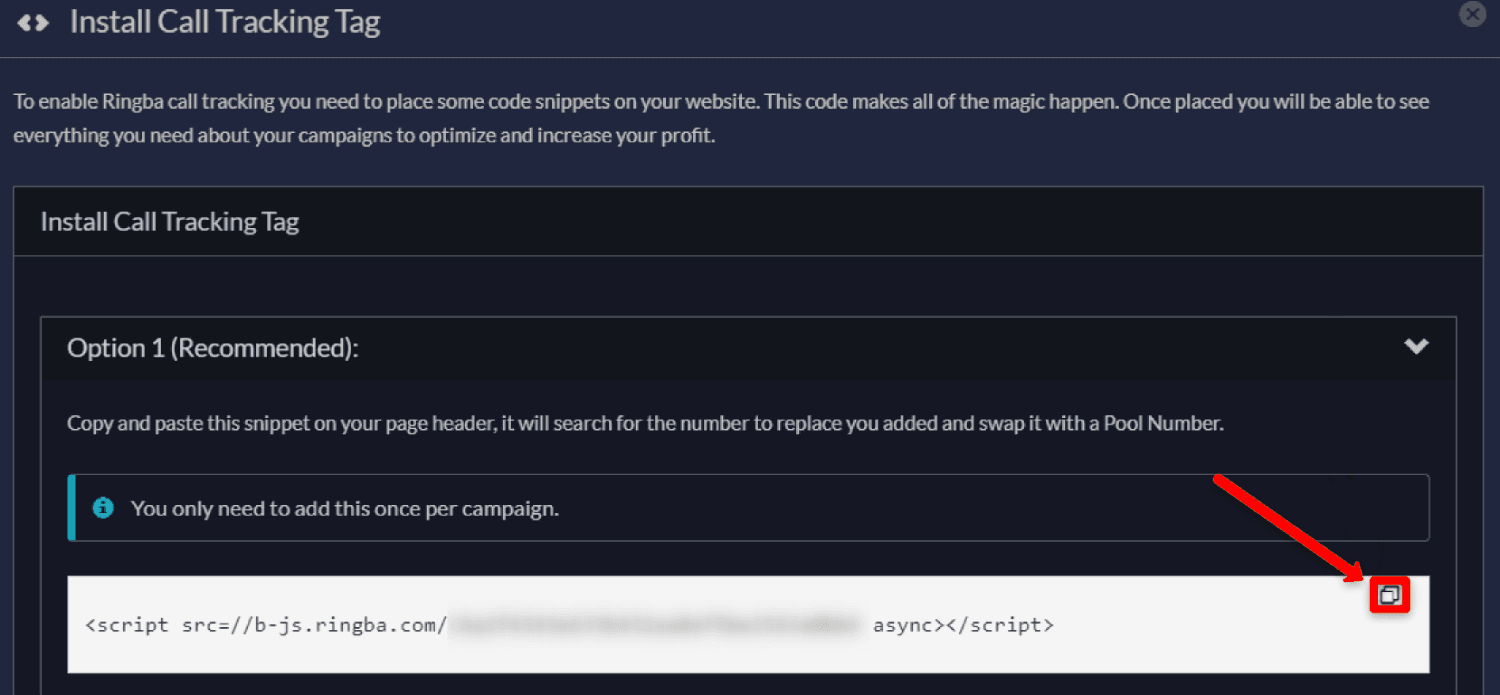
- When Tag is created, then you will need to add the tag to your page. Click icon show below to get the script.

- Then copy the script from Option 1 and add it to your landing page, between BODY tags.
If you are using Direct tracking method, then this script must go below your Skro tracking pixel code. See the example code below.
<html>
        <head>
            <script type="text/javascript">!function () {
                const config = {
                    organicCampaignToken: "",
                    customDomain: "skrotrack.com",
                    firstClickAttribution: false,
                    cookieName: "skro-click-id",
                    campaignParameterName: "trck",
                    httpProtocol: "https",
                    cookieExpTime: 30 * 24 * 60 * 60 * 1000
                };
                let skroCookie = getCookie(config.cookieName);
                let sessionClickID = sessionStorage.getItem(config.cookieName);
                let URLParams = new URLSearchParams(window.location.search);
                let campaignID = URLParams.get(config.campaignParameterName);
                let skroClickId = URLParams.get("skrocid");
                let pixelParams = removeParam(config.campaignParameterName, window.location.search);
                if (skroClickId !== null) {
                    if (!sessionClickID) {
                        if (skroCookie === null || skroCookie === undefined || skroCookie === 'undefined' || !config.firstClickAttribution) {
                            setCookie(config, skroClickId);
                        }
                        setSessionClickId(config, skroClickId);
                    }
                    return false;
                }
                if (sessionClickID !== null && sessionClickID !== undefined) {
                    window.skclid = sessionClickID;
                }
                if (!campaignID || campaignID === 'undefined' || campaignID === "") {
                    campaignID = config.organicCampaignToken;
                }
                if (!sessionClickID && campaignID !== "") {
                    let xhr = new XMLHttpRequest();
                    xhr.open("GET", config.httpProtocol + "://" + config.customDomain + "/offer?trck=" + campaignID + "&" + pixelParams);
                    xhr.send();
                    xhr.onreadystatechange = function () {
                        if (xhr.readyState === 4 && xhr.status === 200) {
                            let resp = JSON.parse(xhr.response);
                            let clickId = resp?.clickId;
                            if (skroCookie === null || skroCookie === undefined || skroCookie === 'undefined' || !config.firstClickAttribution) {
                                setCookie(config, clickId);
                            }
                            setSessionClickId(config, clickId);
                        }
                    };
                }

                function setCookie(config, clickId) {
                    window.skclid = clickId;
                    let expirationTime = config.cookieExpTime, date = new Date(), dateTimeNow = date.getTime();
                    date.setTime(dateTimeNow + expirationTime);
                    document.cookie = config.cookieName + "=" + clickId + "; expires=" + date.toUTCString() + "; path=/; domain=." + location.hostname.replace(/^www\./i, "");
                }

                function setSessionClickId(config, clickId) {
                    window.skclid = clickId;
                    sessionStorage.setItem(config.cookieName, clickId);
                }

                function getCookie(name) {
                    let value = "; " + document.cookie;
                    let parts = value.split("; " + name + "=");
                    if (parts.length === 2) return parts.pop().split(";").shift();
                }

                function removeParam(key, sourceURL) {
                    let rtn, param, params_arr = [],
                        queryString = (sourceURL.indexOf("?") !== -1) ? sourceURL.split("?")[1] : "";
                    if (queryString !== "") {
                        params_arr = queryString.split("&");
                        for (let i = params_arr.length - 1; i >= 0; i -= 1) {
                            param = params_arr[i].split("=")[0];
                            if (param === key) {
                                params_arr.splice(i, 1);
                            }
                        }
                        rtn = params_arr.join("&");
                    }
                    return rtn;
                }
            }();</script>
        </head>
        <body>

        <script src=//b-js.ringba.com/CA91ba94034ecf44eea8c55da3f68dd400 async></script>

        </body>
    </html>
Step 4. Create a URL parameter to collect Skro Click ID value
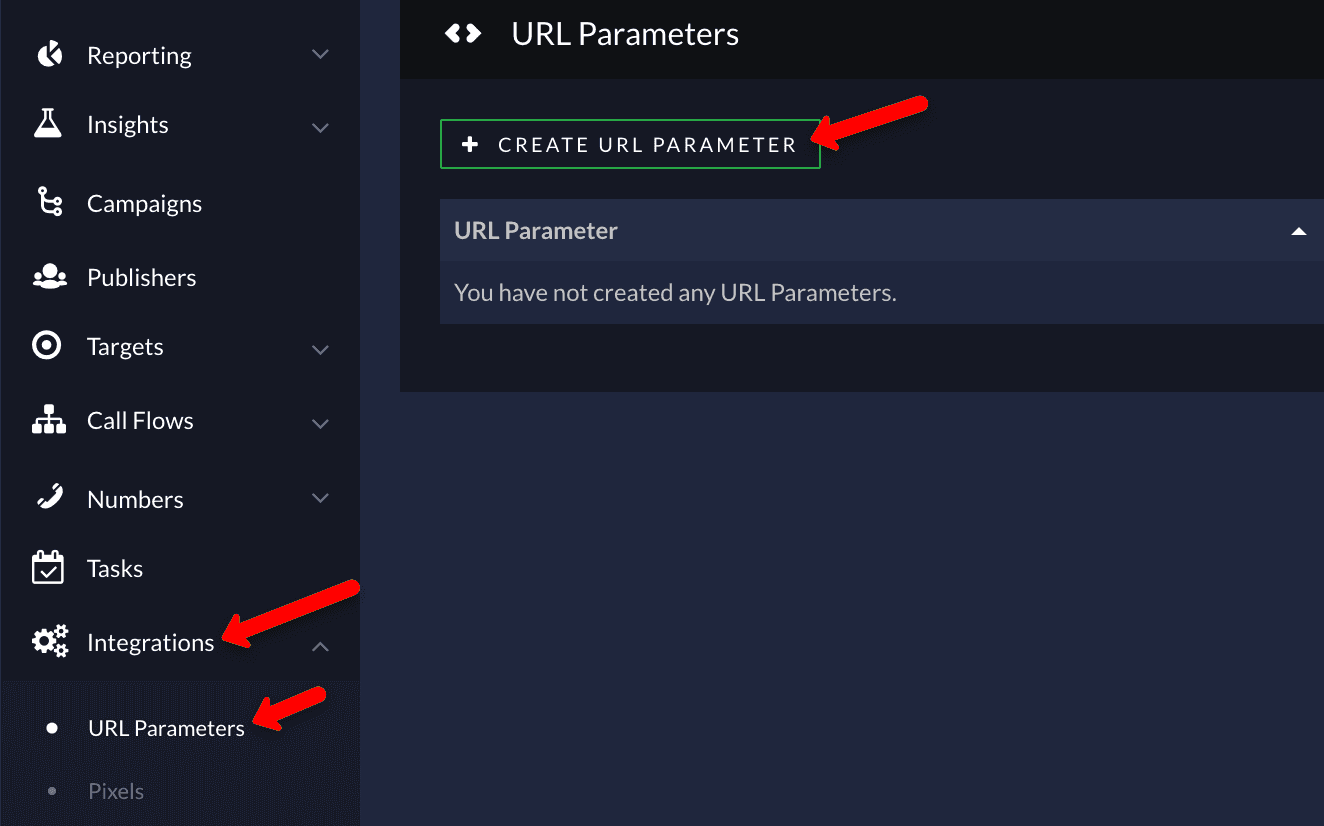
- Go to Integrations → URL Parameters → Create URL Parameter.
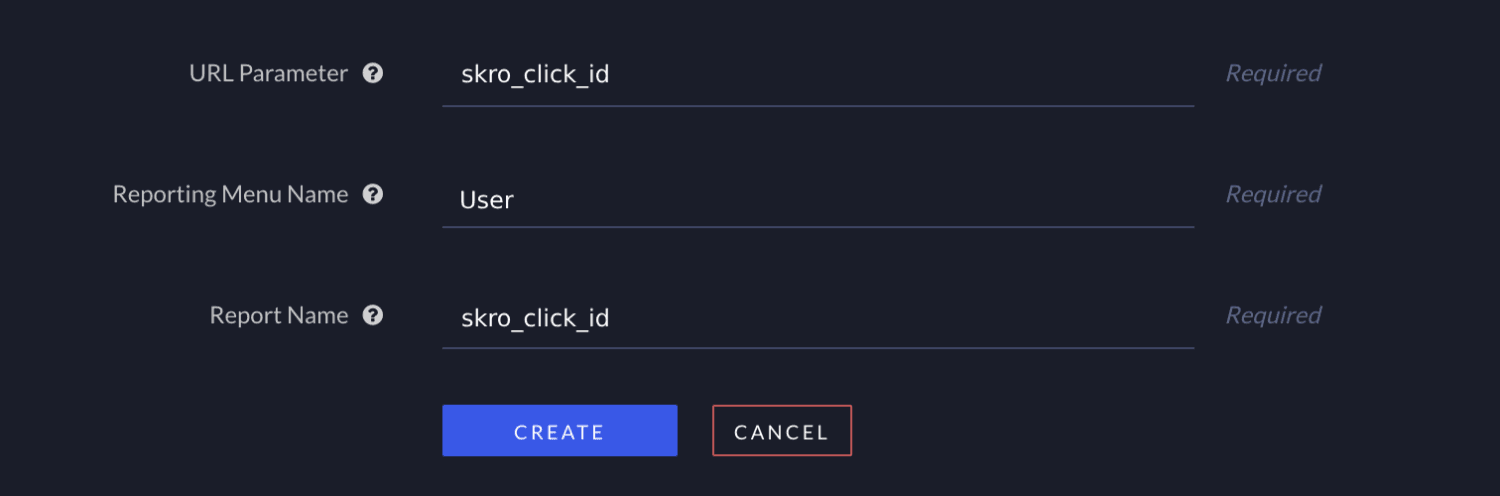
- Next, enter skro_click_id for both the URL Parameter and Report Name sections and User for the Reporting Menu Name.
– You can add multiple custom parameters to your Skro Offer URL, and all of them will be
                            captured by Ringba in Tags. Here is an example of an Offer URL with additional parameters and
                            Skro dynamic tokens: https://test.offer.com?skro_click_id={clickId}&country={country}&adName={custom1}
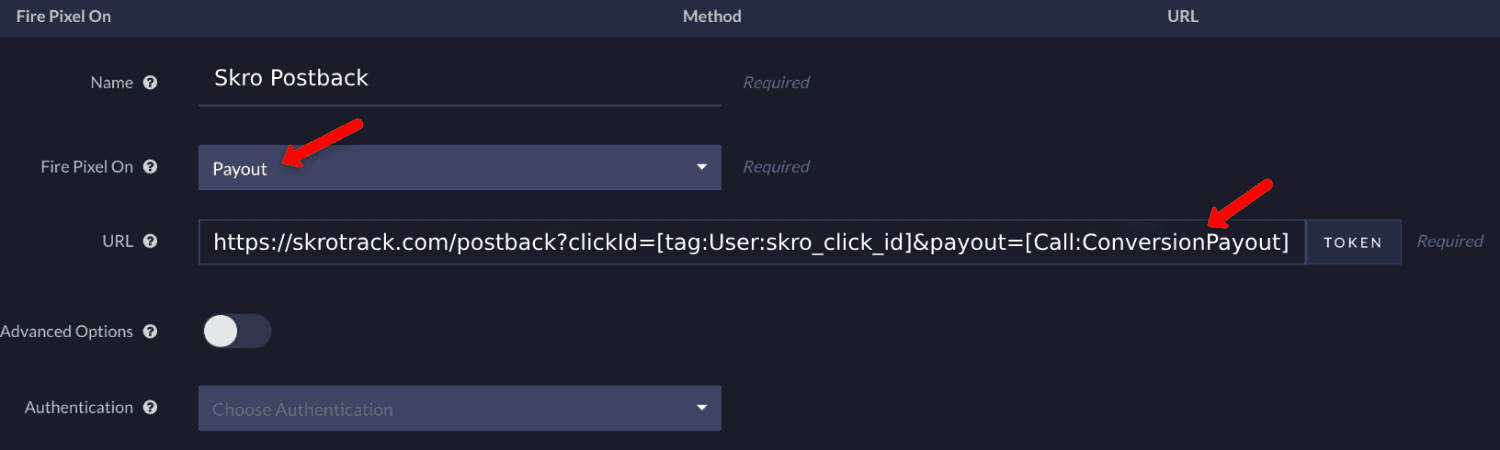
– Creating a new URL Parameter will automatically create a relevant dynamic token [tag:User:skro_click_id] which can be used later for Skro S2S postback.
– Additionally, you can use this data for routing logic in the Ringba platform by applying Tag Routing Filters.
-
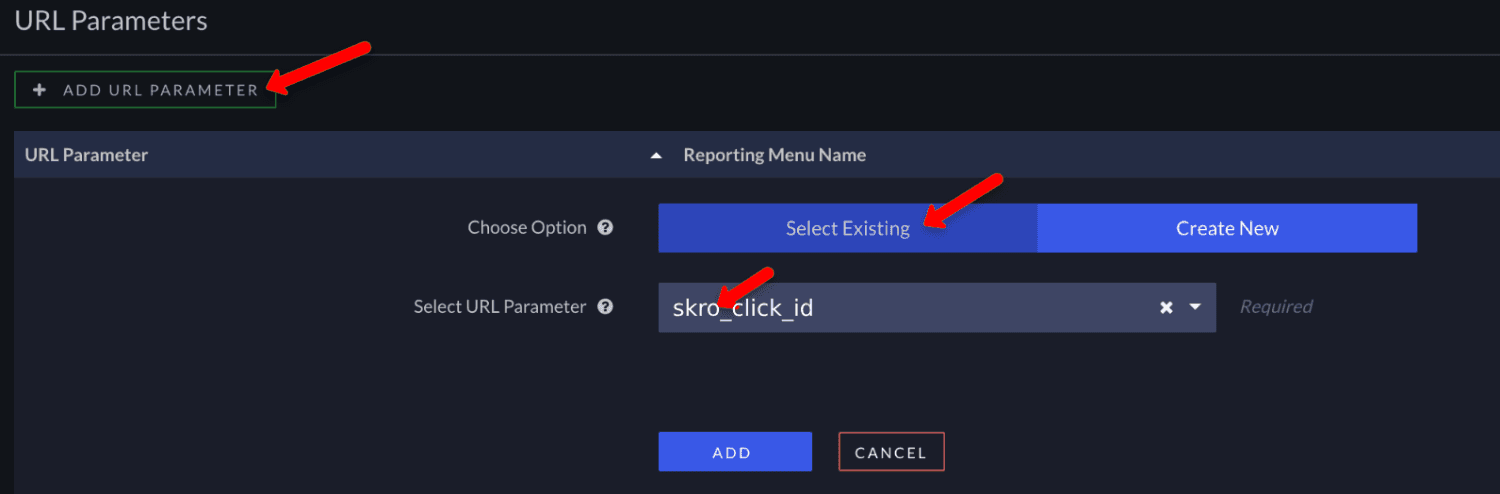
After this, we will need to associate the URL Parameter with your campaign in Ringba. To do that, go to Campaigns → select your campaign → scroll down to URL Parameters.
-
Click Add URL Parameter → Select Existing → select URL parameter skro_click_id → click Add.
Step 5. Add the following script to the body section of your landing page
- Copy and paste this script into BODY tags below Skro and Ringba scripts you added earlier. This script collects the Skro Click ID and other params and sending them to Ringba.
<script>
            (window._rgba_tags = (window._rgba_tags || [])).push({type: "User", track_attempted: "yes"});
            var intervalId = setInterval(() => {
                if (window.skclid !== undefined) {
                    (window._rgba_tags = (window._rgba_tags || [])).push({type: "User", skro_click_id: window.skclid});
                    console.log("Add Skro Click ID to Ringba: ", window.skclid);
                    clearInterval(intervalId);
                } else {
                    console.log("Waiting skclid value...");
                }
            }, 500);
        </script>
Step 6. Add your Skro Postback URL to Ringba
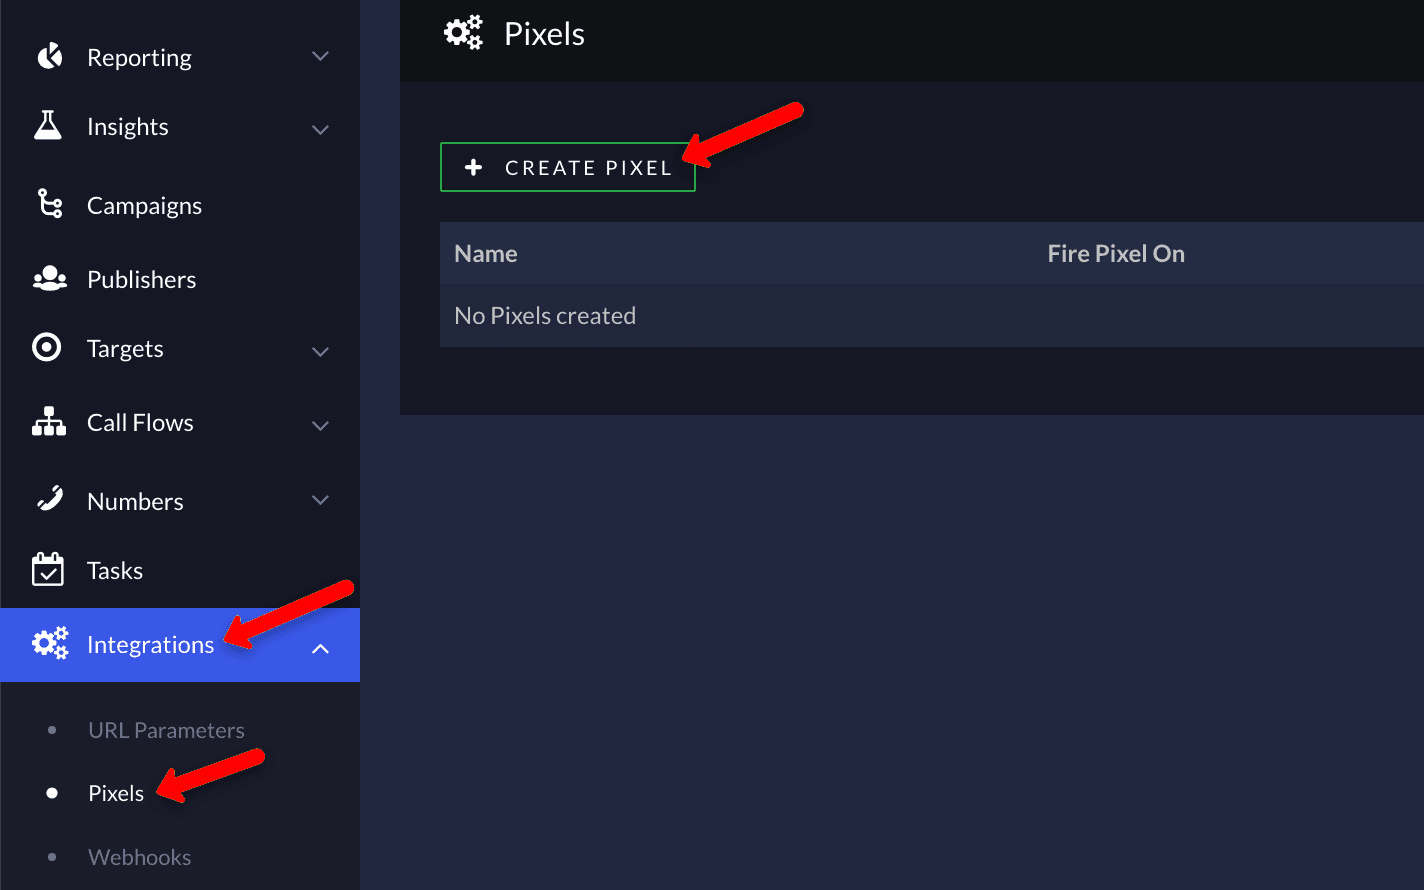
- Go to Integrations → Pixels → Create Pixel.
- To track your Sale conversions in Skro, use this postback URL:
Integration is done. You are now ready to add your landing page as an Offer and create your first Campaign in Skro.
Verify the setup
Follow a campaign link and complete a test conversion using your provider’s test workflow. Confirm that the original click ID reaches the provider and is returned to Skro, then check the event and revenue in your campaign report.
Troubleshooting
If data is missing, check the selected workspace, integration, campaign, and reporting date range. Compare parameter names and macro values with the examples in this guide before repeating the test.
Related guides
Need help with this guide? Contact Skro support.