

Shopify integration
Connect Shopify with Skro to track store events, attribute purchases, and report campaign revenue.
Use this guide to connect your Shopify store with Skro and attribute store events to your advertising campaigns.
- See the true ROI of every ad
- Track every PageView, ViewContent, AddToCart, InitiateCheckout and Purchase event
- Compare advertising costs with attributed revenue
- Send supported conversion events to Facebook and TikTok
- Track even Organic traffic
This guide will teach you how to set up Custom Conversions, integrate Shopify, and track campaigns for both paid ads and organic traffic. Please note: this guide does not cover every option available in Skro or your traffic source. You should already have basic knowledge of creating campaigns in both Skro and your traffic source.
Step 1. Set up custom conversion events
Skro supports two types of conversion events:
- Standard Event – Tracks a single event only.
- Custom Conversion Events – Tracks multiple events. (Note: Skro’s custom conversions are not the same as Facebook’s Custom Conversions. You can use standard events as custom conversions in Skro.)
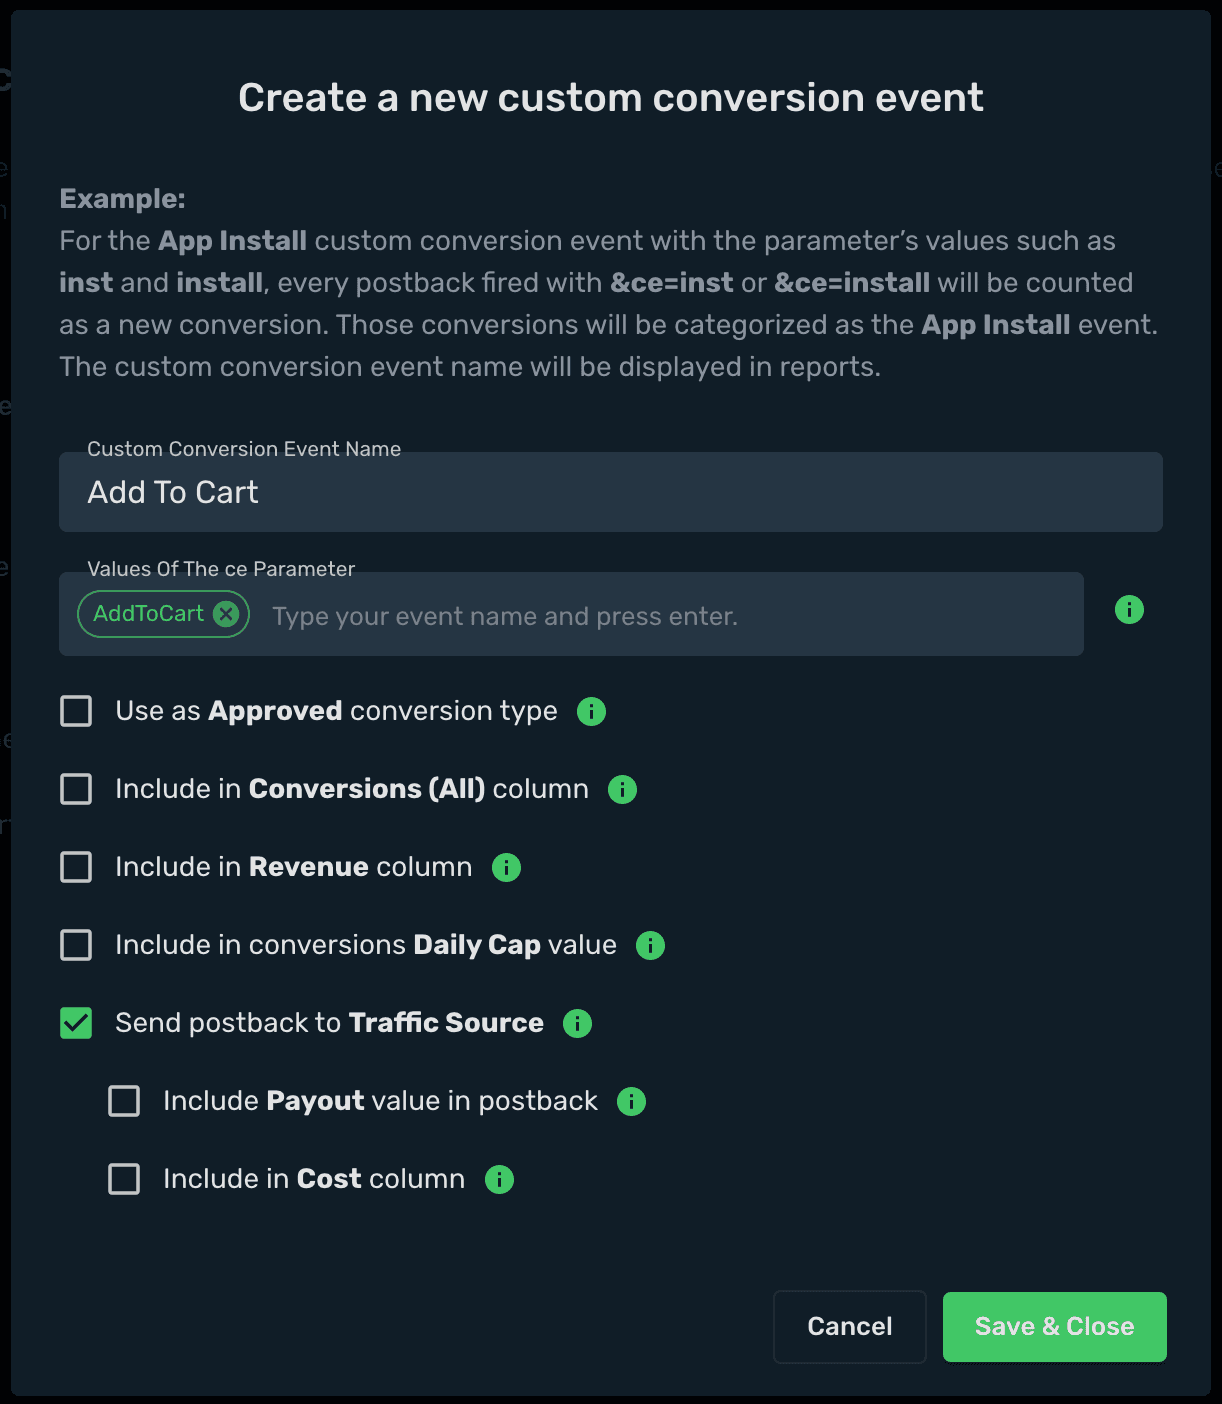
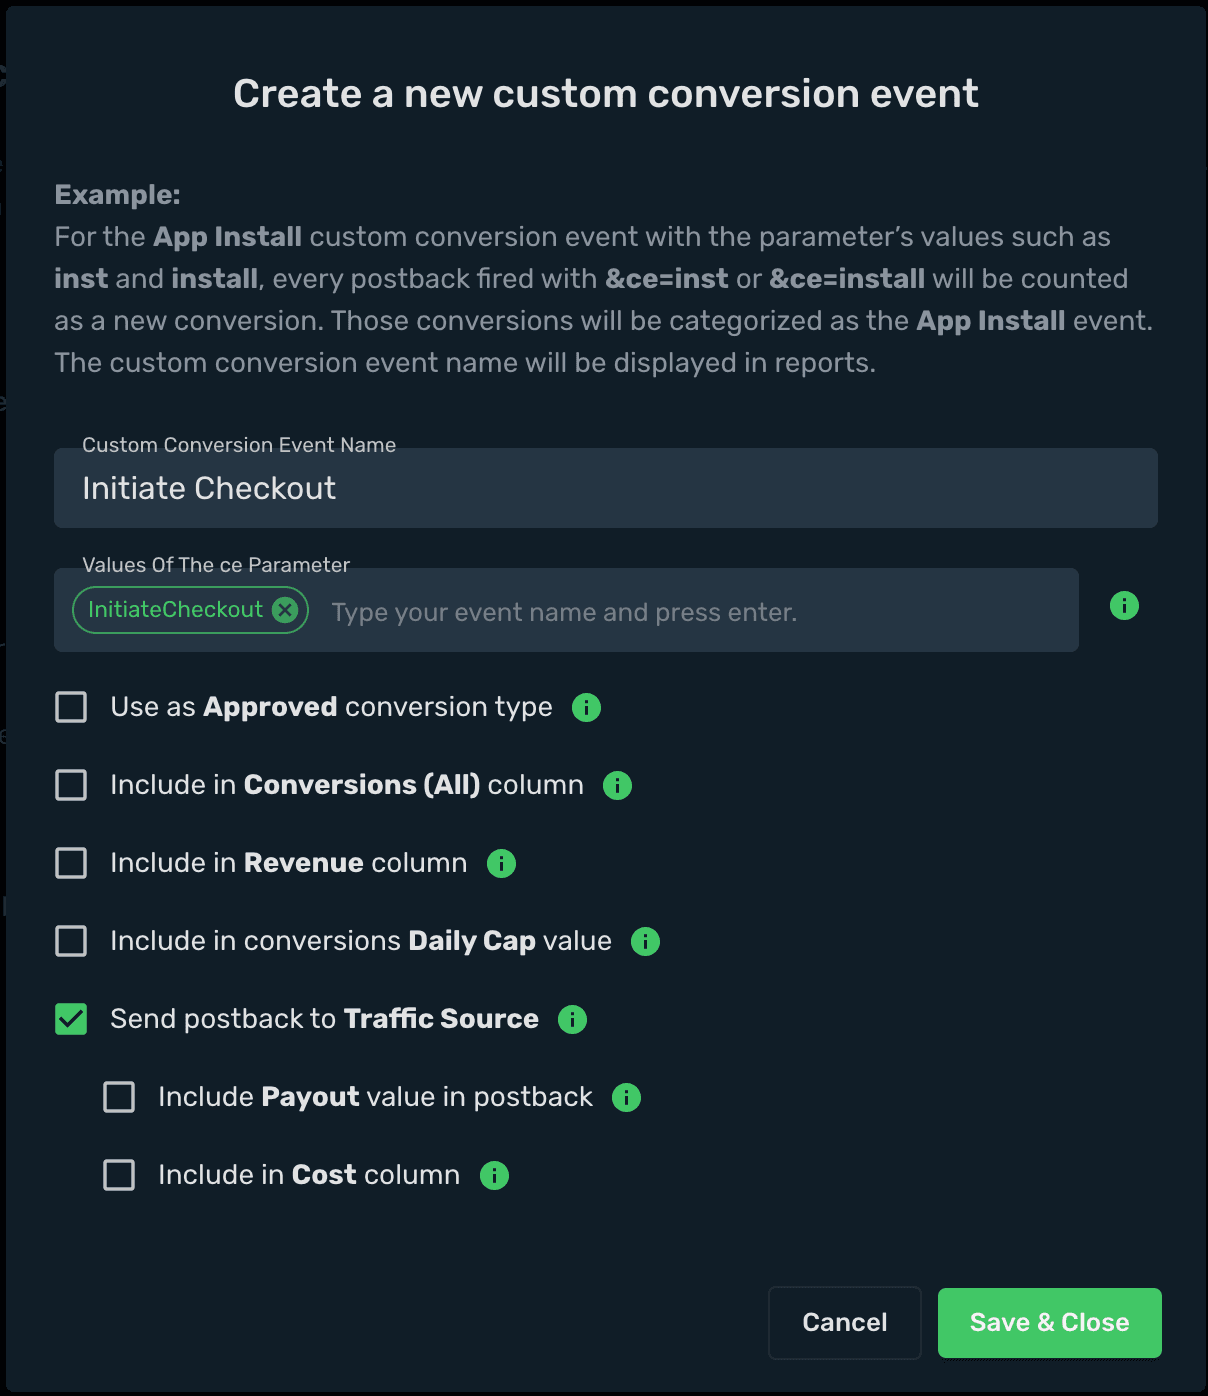
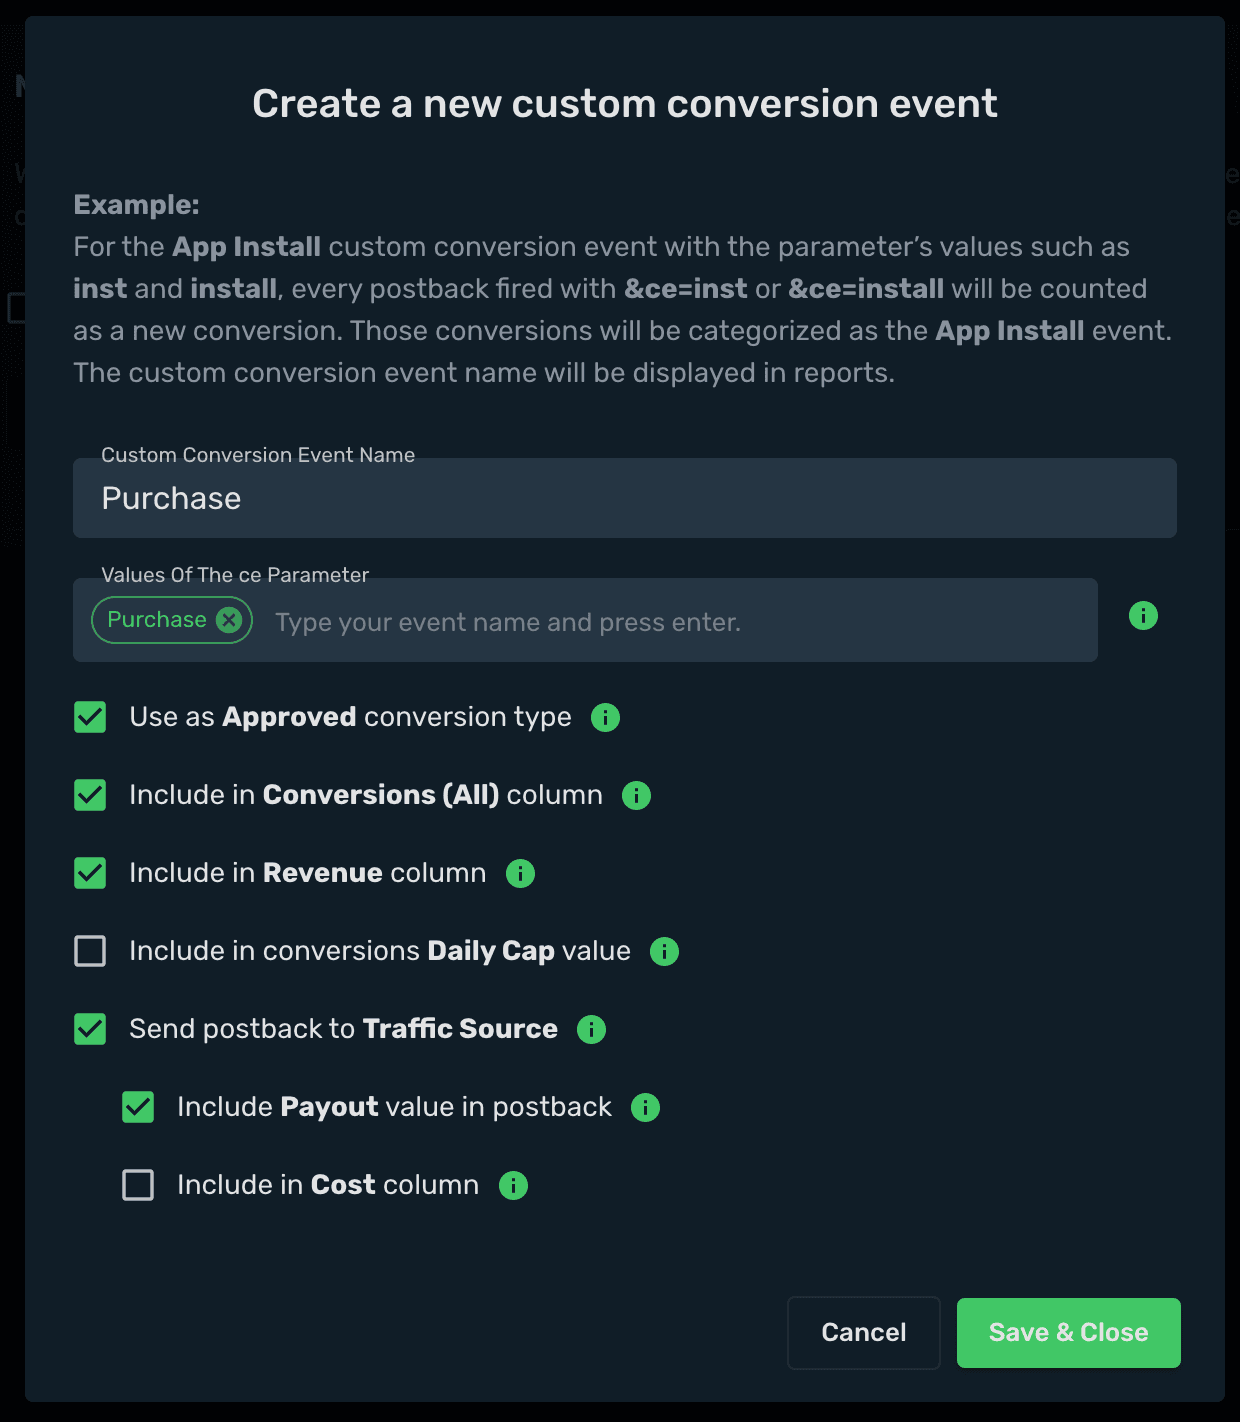
Let’s create five custom conversion events that are compatible with both Facebook and TikTok ads.
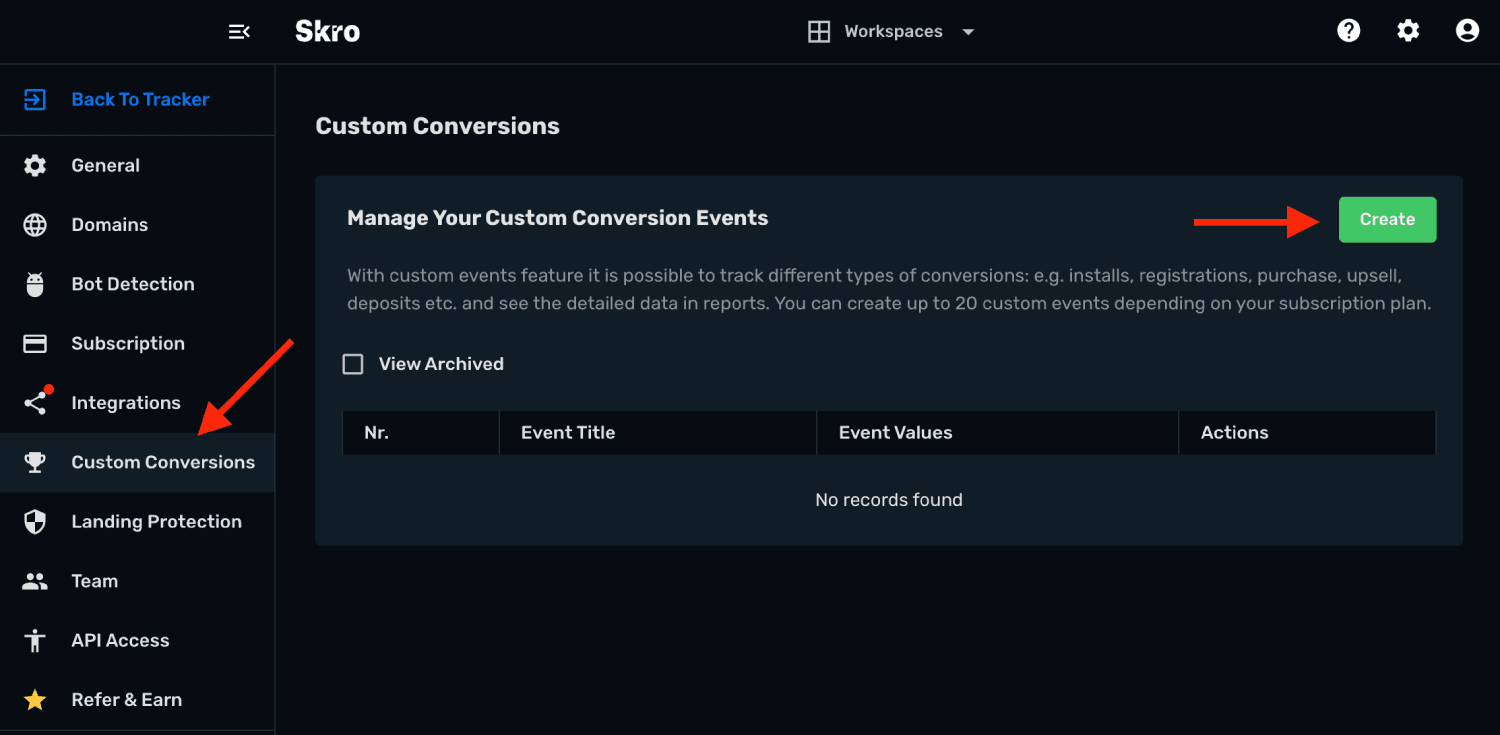
- In Skro, go to Custom Conversions → Create.
- Create an event called AddToCart.
- Create an event called InitiateCheckout.
- Create an event called Purchase.
- Create an event called PageView.
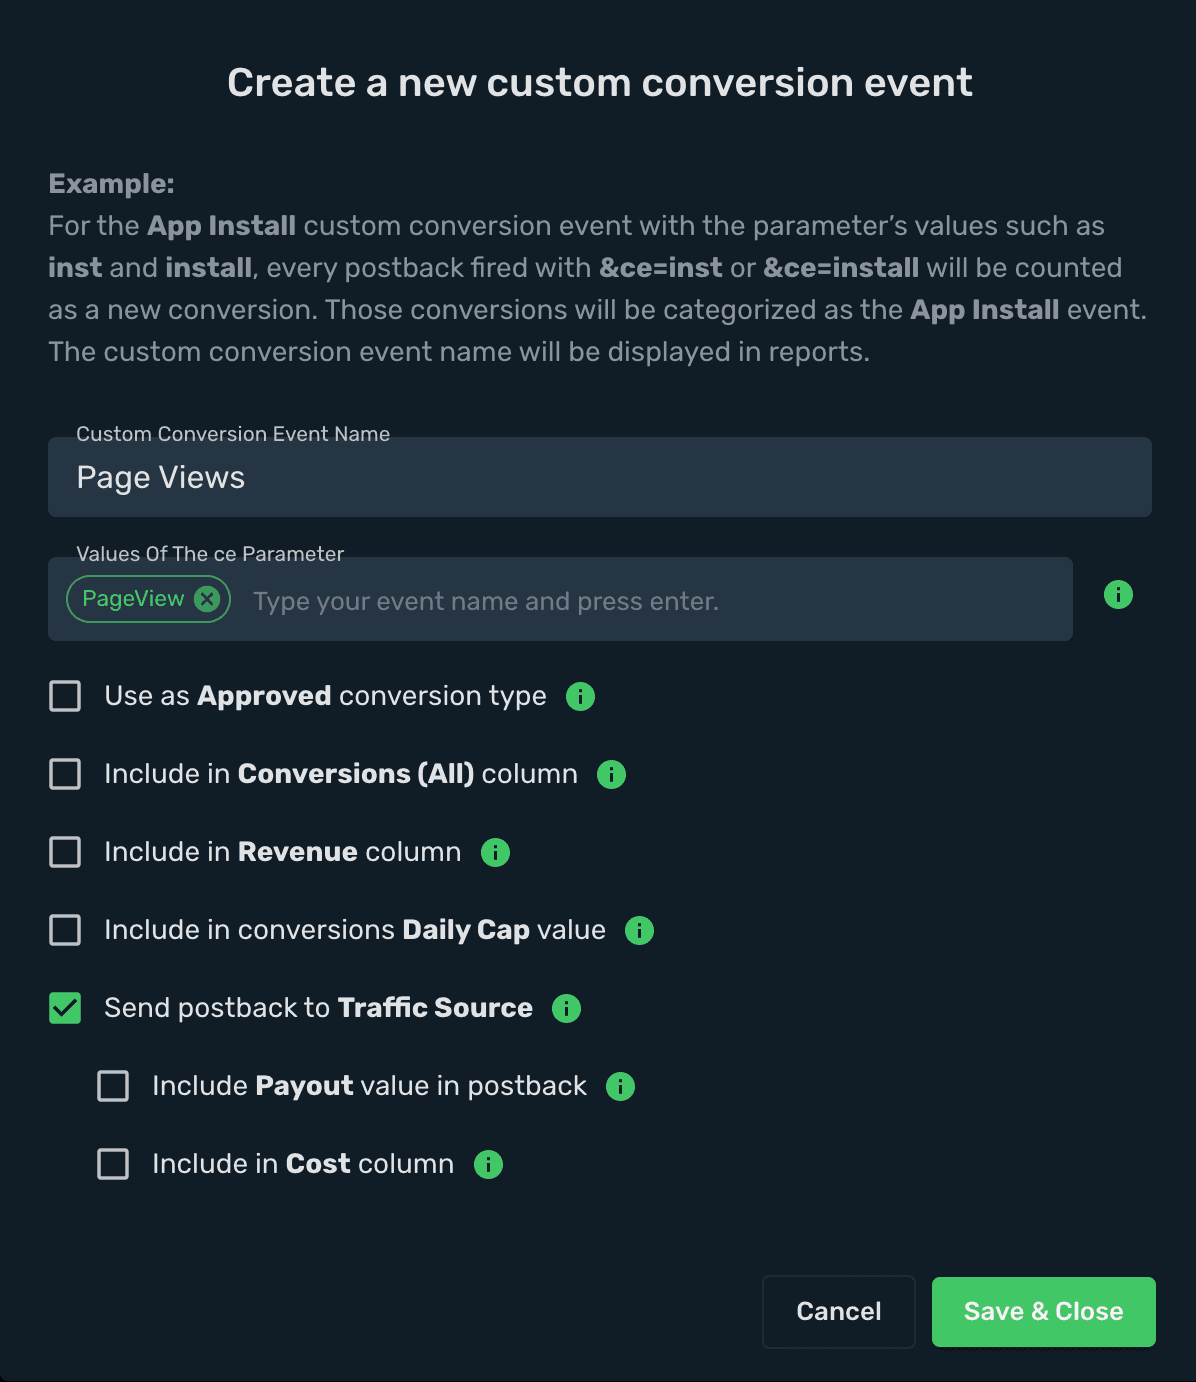
- Create an event called ViewContent.
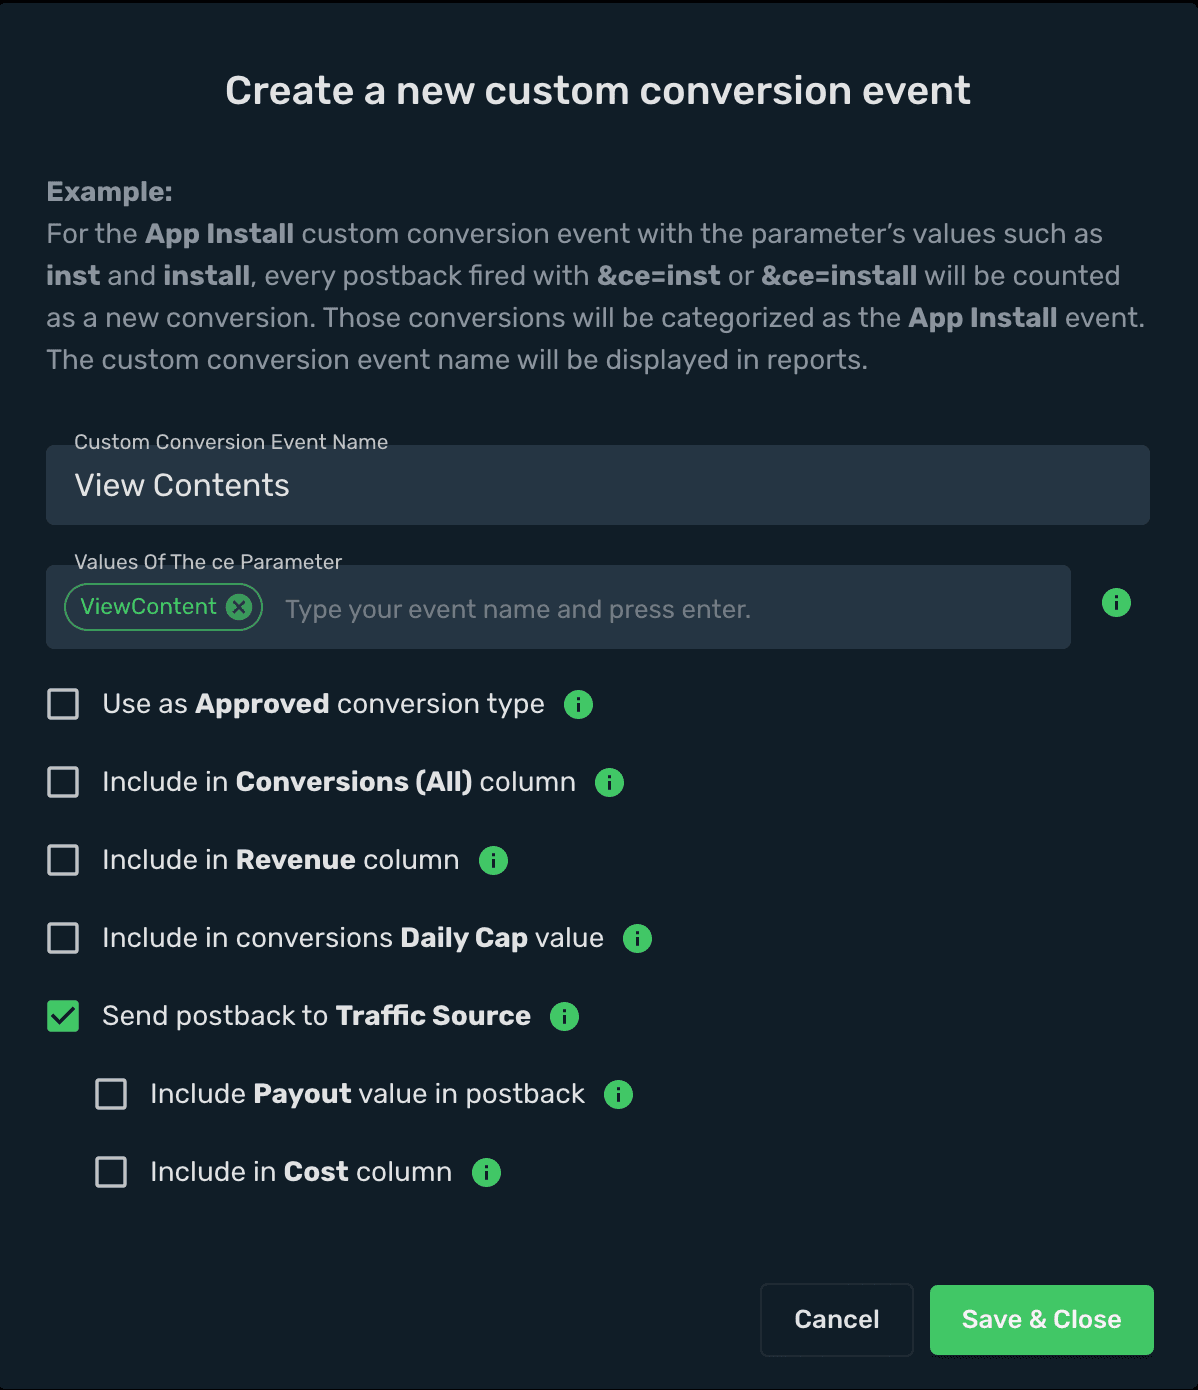
You can use different event names if your traffic source requires them. For example, instead of Purchase you might use sale. Keep in mind that event names are case-sensitive and must match exactly in both Skro and your traffic source.
Step 2. Add Shopify integration
-
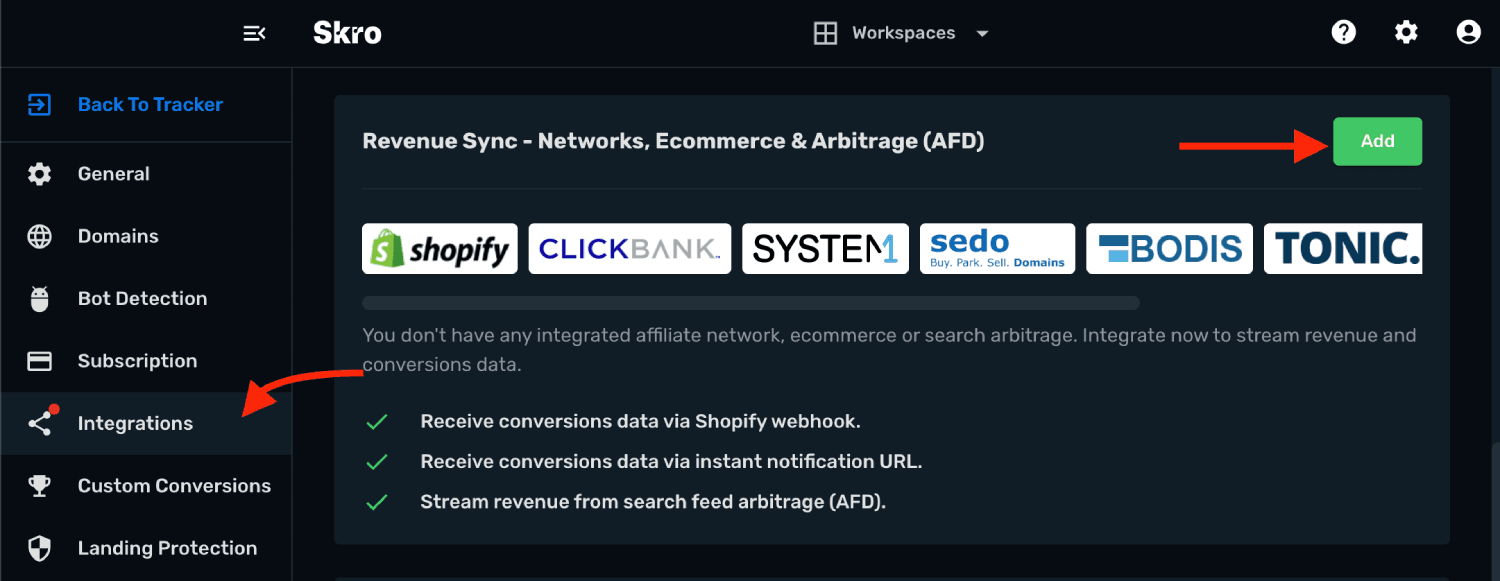
Go to Settings → Integrations in Skro.
-
In the Revenue Sync section, click Add.
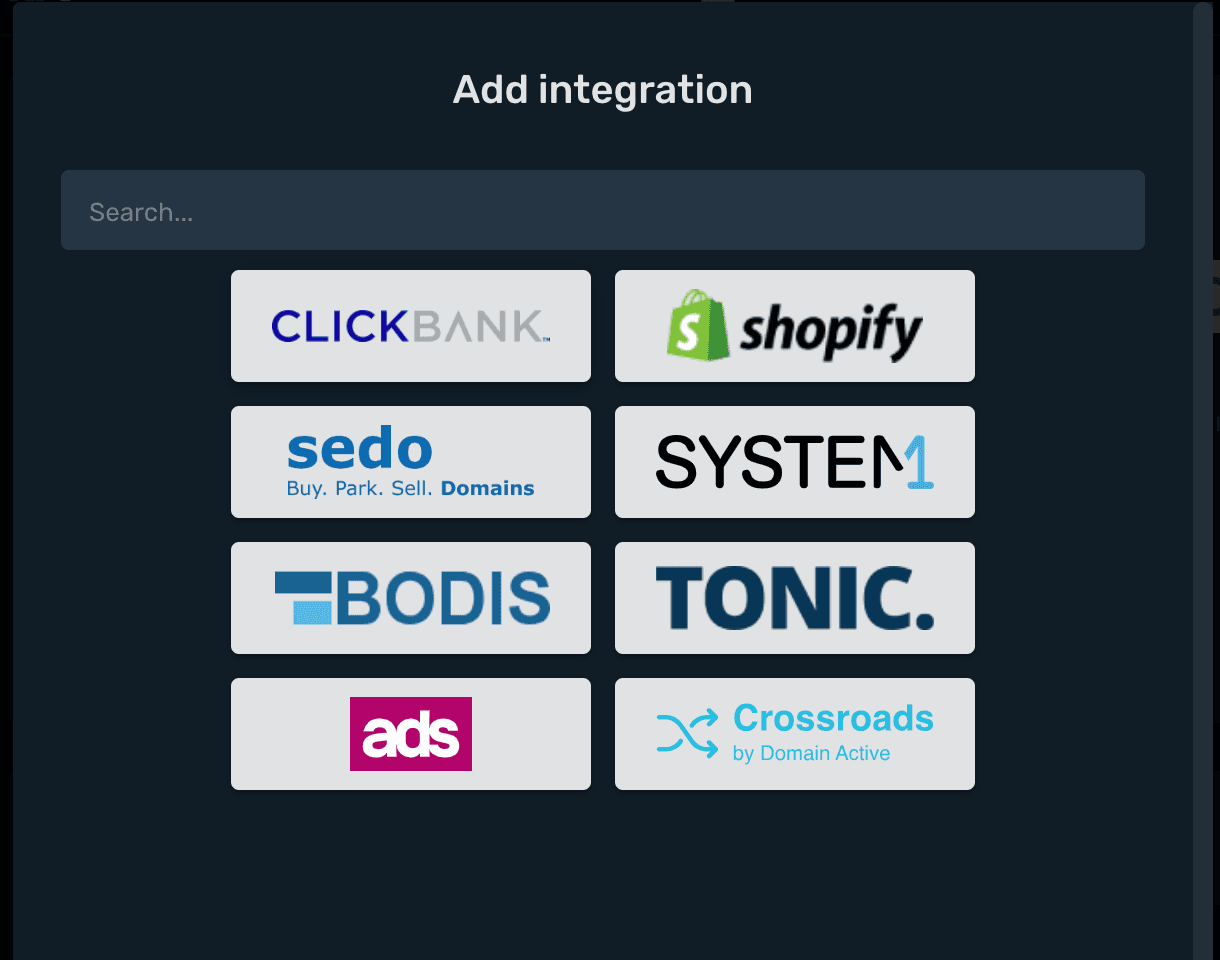
- Click the Shopify template. The integration form will open.
-
Enter your Shopify store name.
-
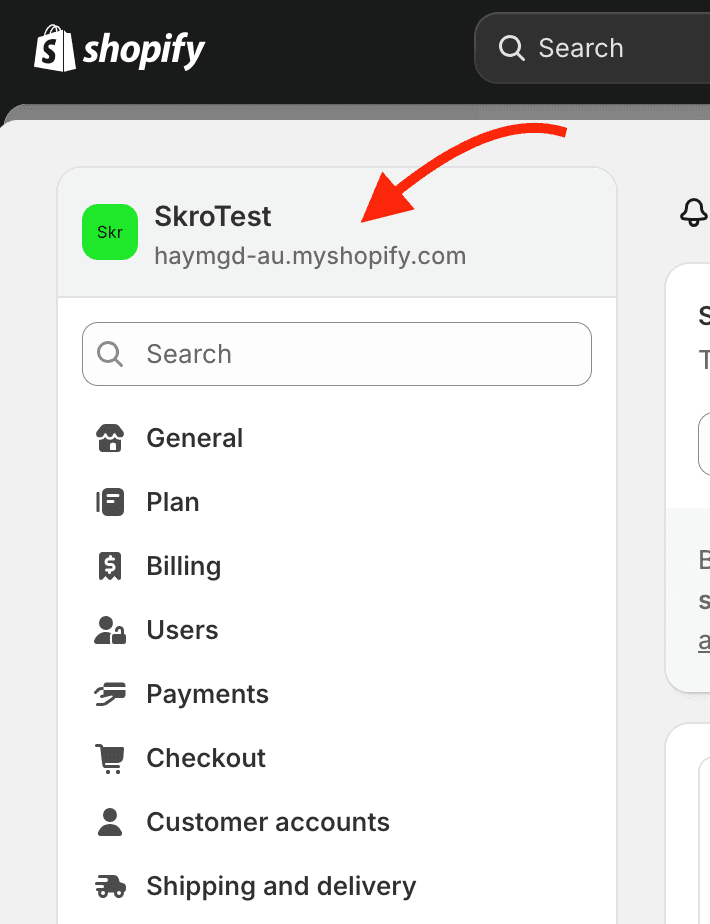
Enter your Shop ID. You can find it in your Shopify admin → Settings. It looks like this: xxxxx.myshopify.com.
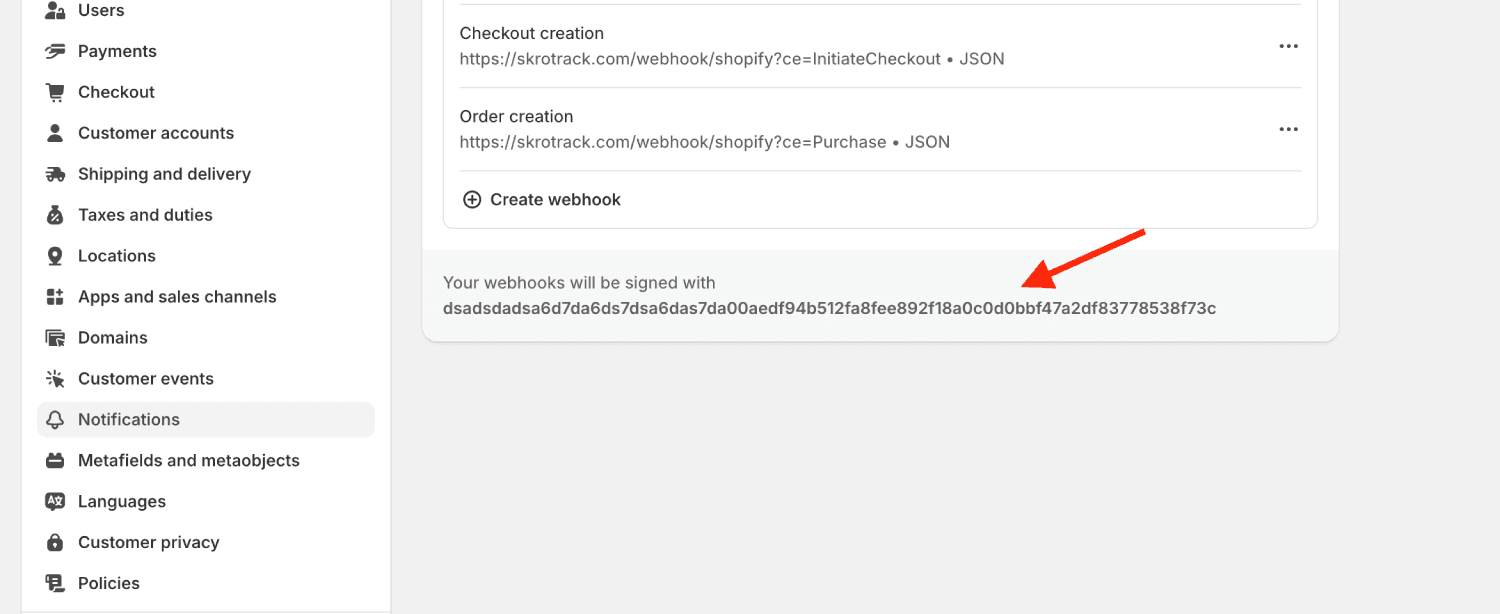
- Enter your Shopify Webhook ID. In your Shopify admin go to Settings → Notifications → Webhooks, copy your webhook token, and paste it into Skro.
- When finished, click Save & Close.
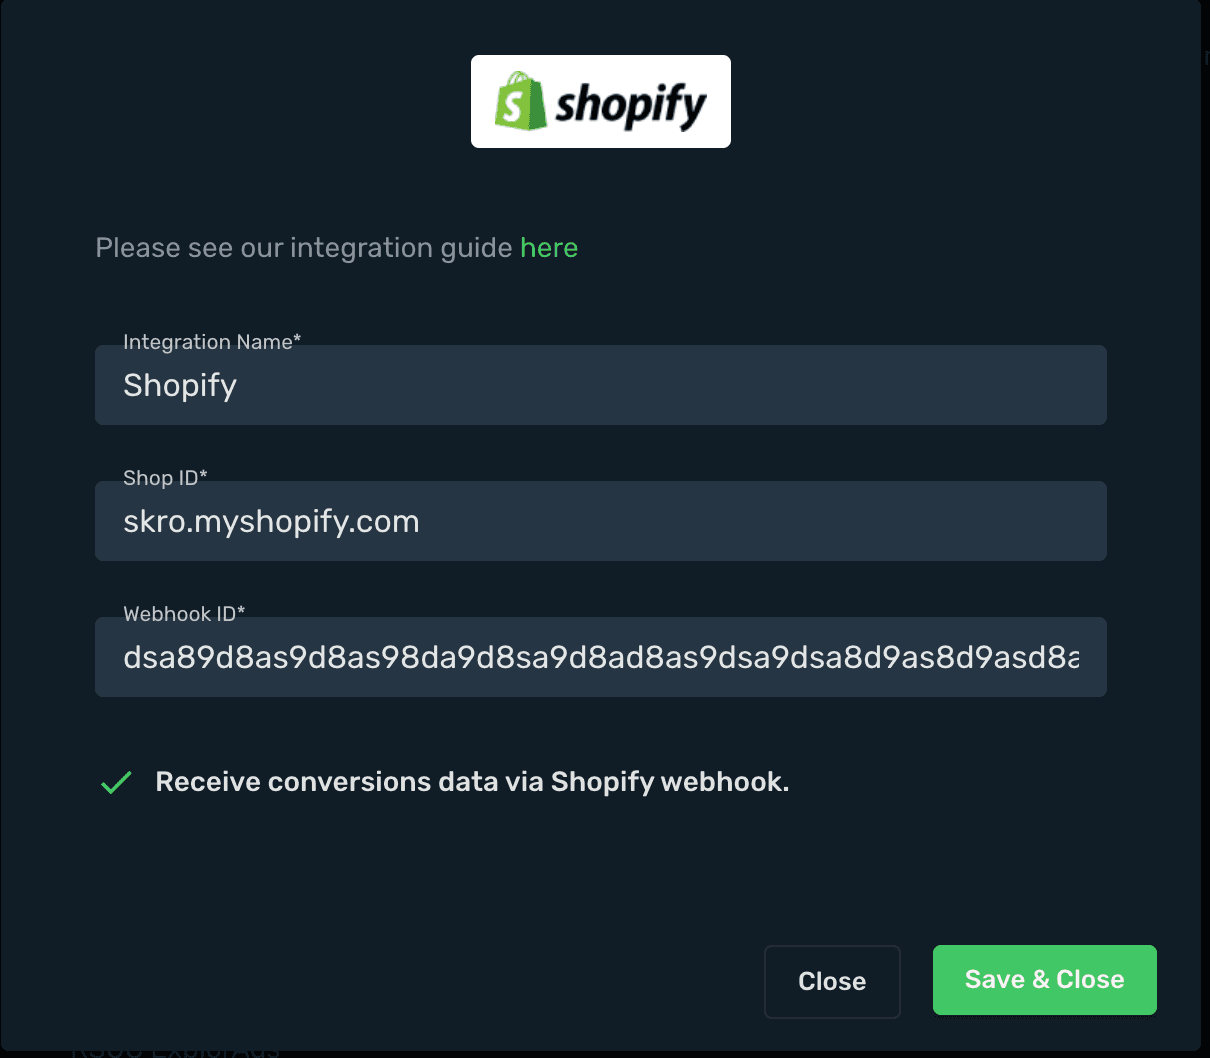
Your Shopify integration is now successfully connected.
Step 3. Set up Shopify Webhooks
Choose a supported webhook API version. Shopify versions webhook payloads along with its APIs; see Shopify API versioning when reviewing your configuration.
-
Go to your Shopify admin → Settings → Notifications → Webhooks and click Create Webhook.
-
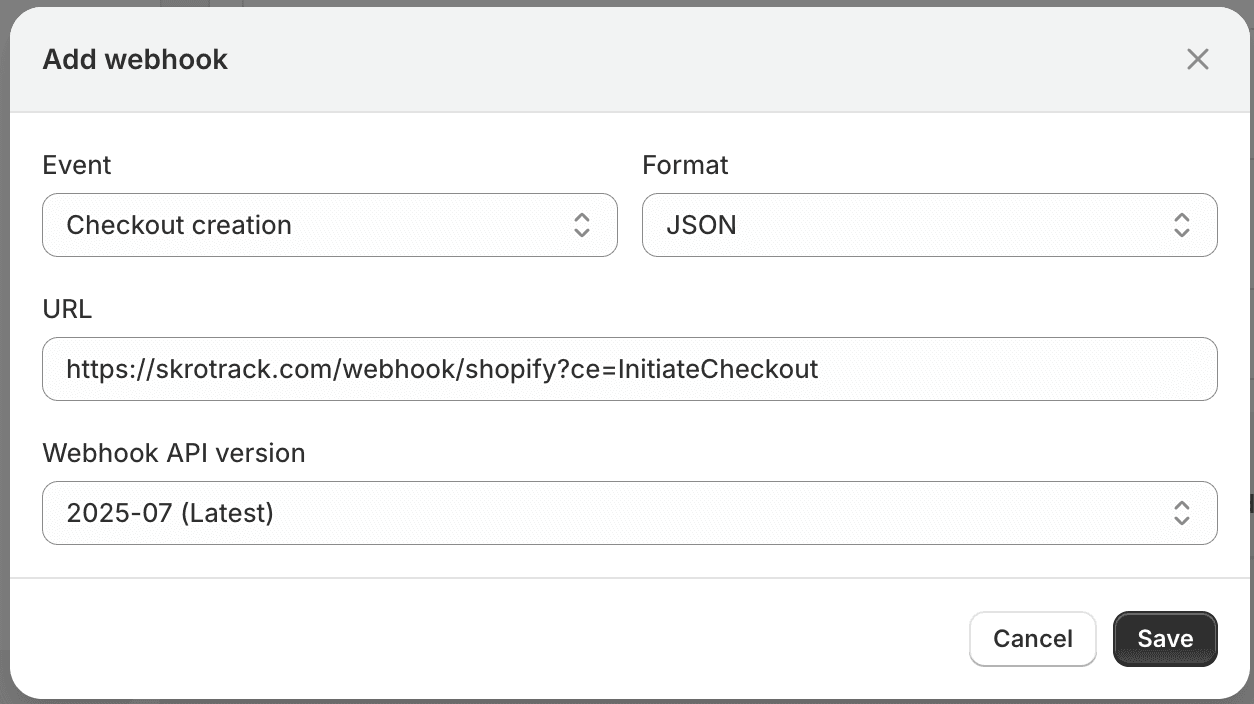
Create a webhook for Checkout creation:
- Event: Checkout creation
- Format: JSON
- URL: https://skrotrack.com/webhook/shopify?ce=InitiateCheckout
- Webhook API version: select a supported version in Shopify
- Create another webhook for Order creation:
- Event: Order creation
- Format: JSON
- URL: https://skrotrack.com/webhook/shopify?ce=Purchase
- Webhook API version: select a supported version in Shopify
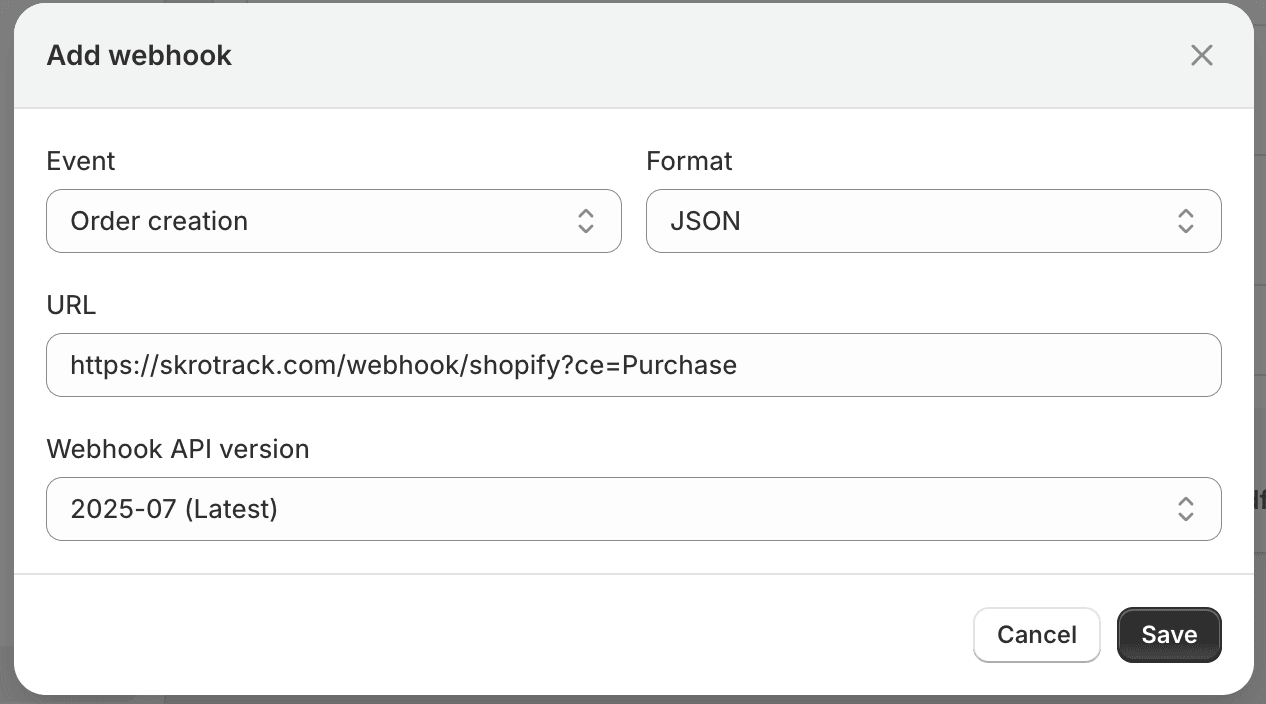
- (Optional) If you prefer not to use Skro Custom Conversions for the Purchase event and instead use a standard postback, configure your webhook like this. The conversion event name will be taken from your campaign (Step 1).
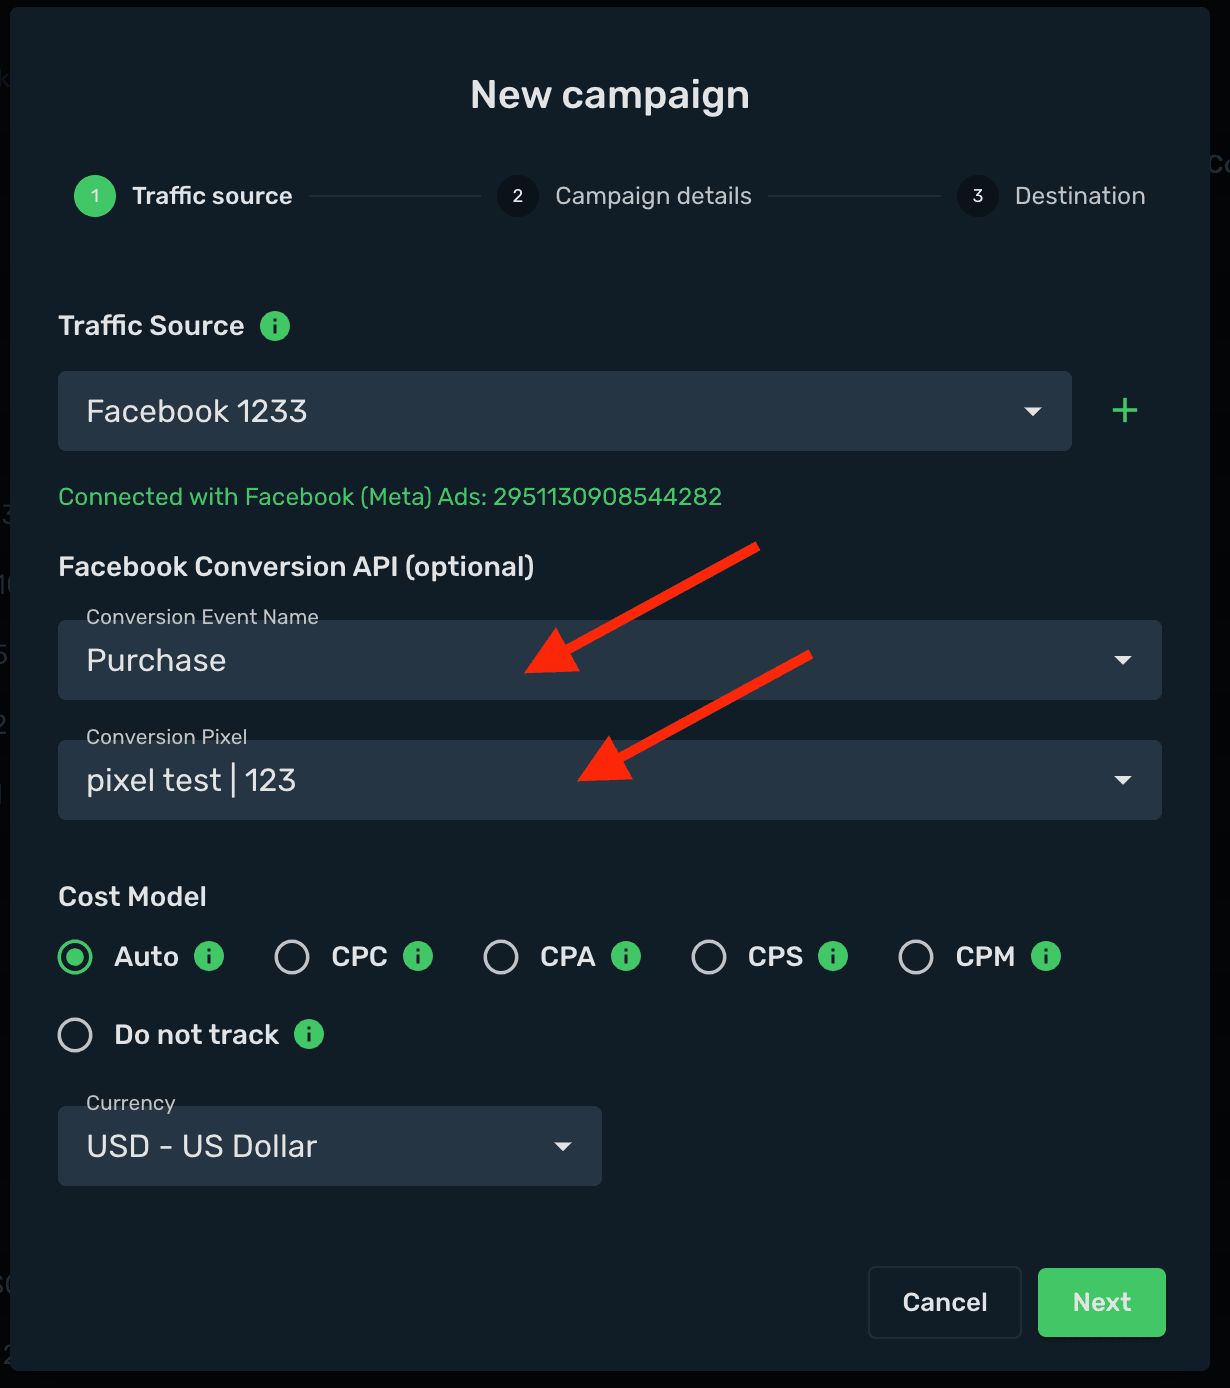
- Standard postback webhook setup:
- Event: Order creation
- Format: JSON
- URL: https://skrotrack.com/webhook/shopify
- Webhook API version: select a supported version in Shopify
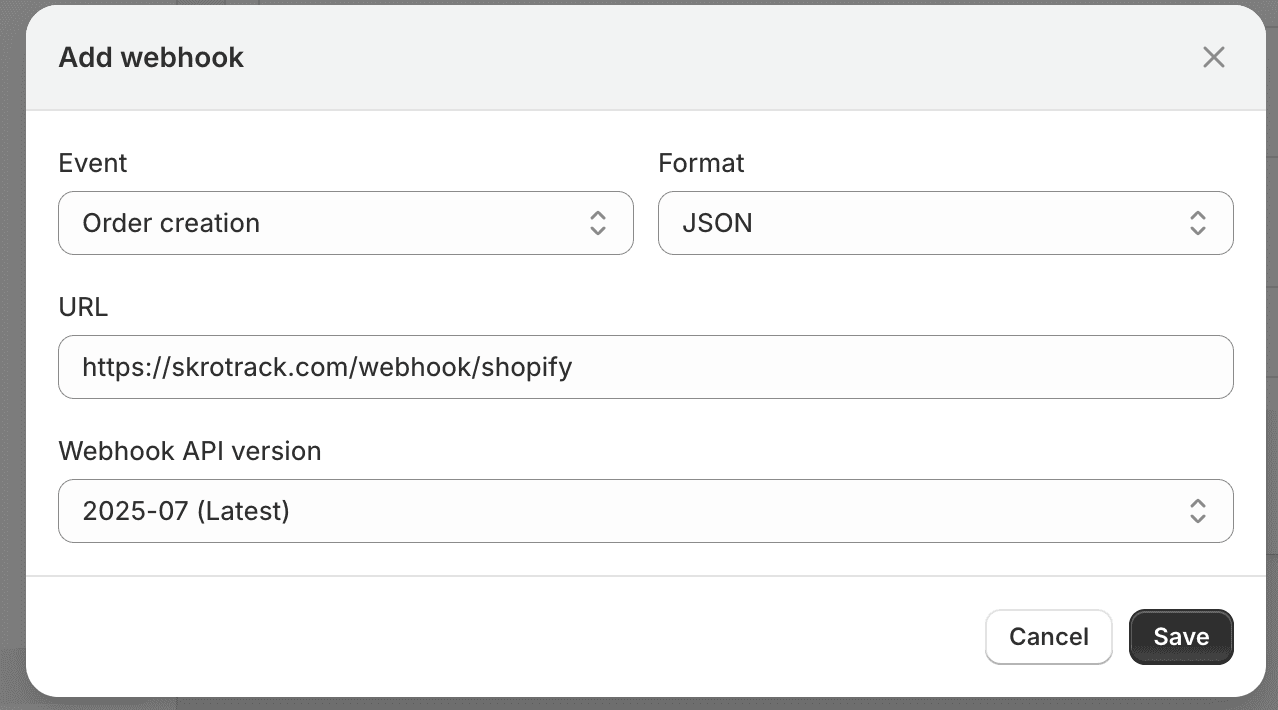
You can replace skrotrack.com with your own custom tracking domain.
Step 4. Add custom pixels for other events
AddToCart Event
You can't track AddToCart events with Webhook, that is why it is needed to install custom tracking pixel.
- Go to your Shopify admin → Settings → Customer Events and click Add custom pixel.
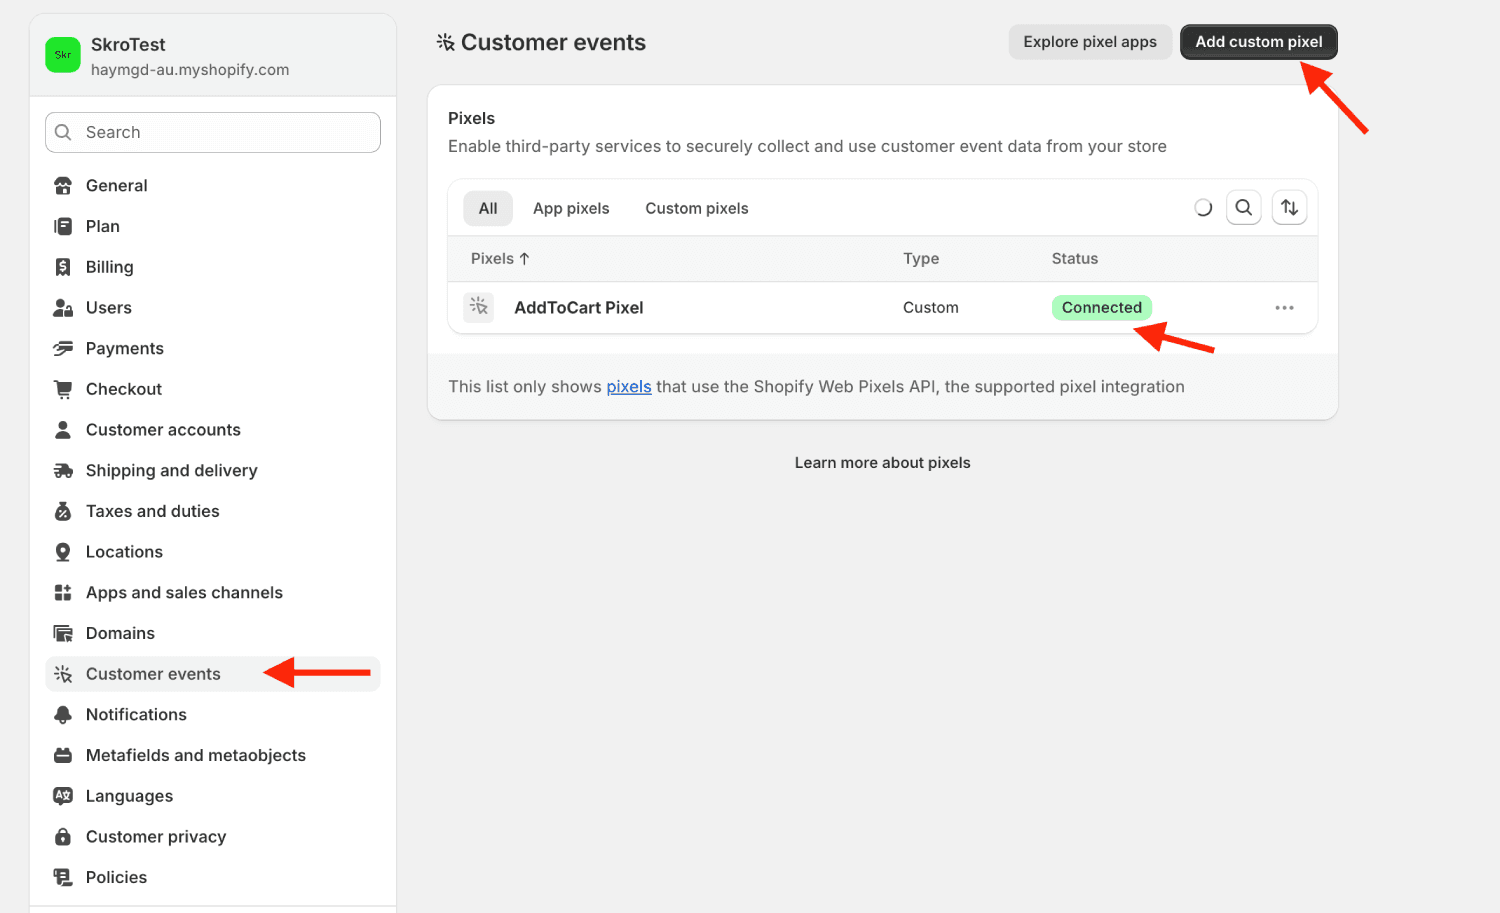
-
Add your pixel name: Add To Cart Pixel
-
Analytics and Marketing needs to be selected.
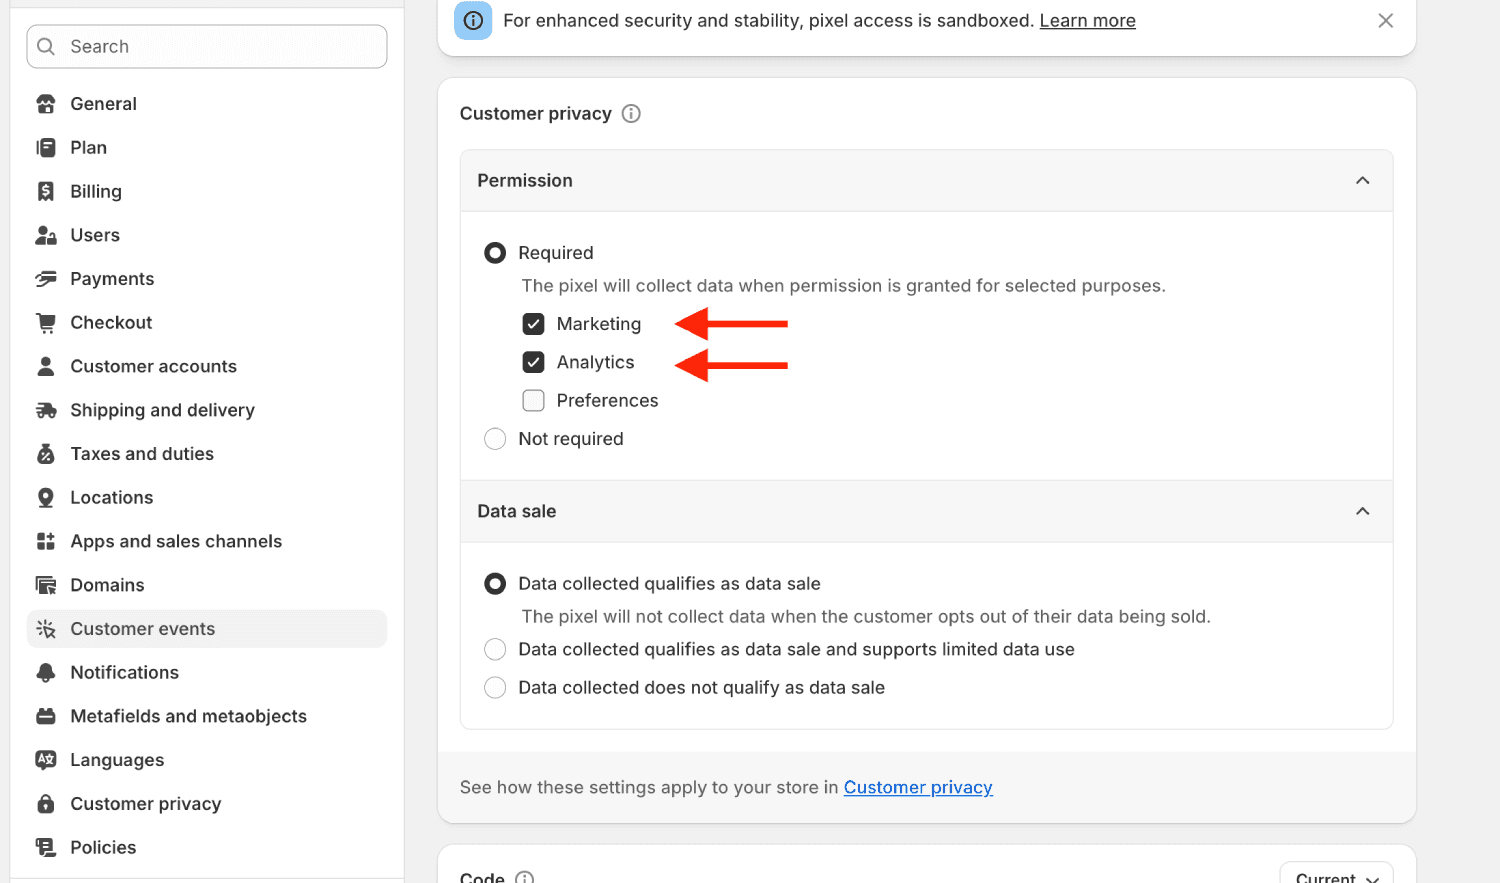
- Place the custom tracking pixel code to track Add To Cart events.
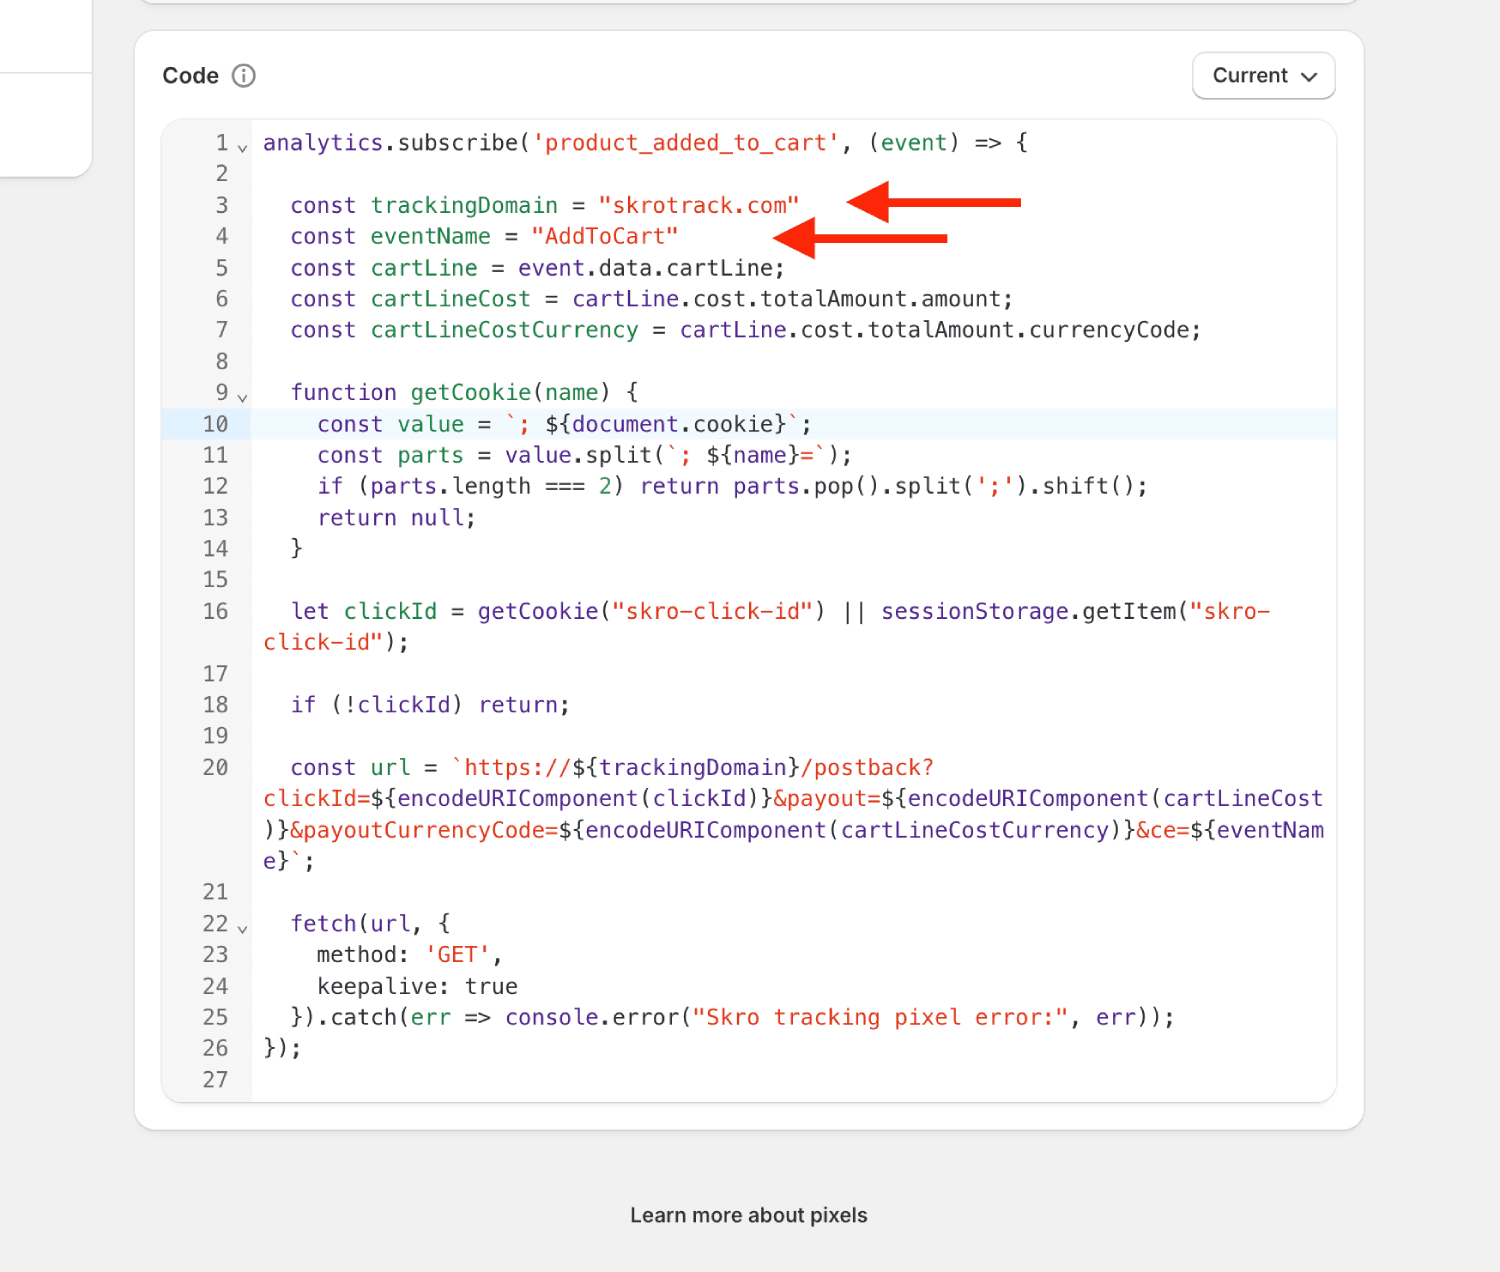
- Copy the pixel code. You can use your own custom tracking domain and if your event name is different, then change it.
analytics.subscribe('product_added_to_cart', (event) => {
    const trackingDomain = "skrotrack.com"
    const eventName = "AddToCart"
    const cartLine = event.data.cartLine;
    const cartLineCost = cartLine.cost.totalAmount.amount;
    const cartLineCostCurrency = cartLine.cost.totalAmount.currencyCode;

    function getCookie(name) {
        const value = `; ${document.cookie}`;
        const parts = value.split(`; ${name}=`);
        if (parts.length === 2) {
            return parts.pop().split(';').shift();
        }
        return null;
    }

    let clickId = getCookie("skro-click-id") || sessionStorage.getItem("skro-click-id");

    if (!clickId) {
        return;
    }

    const url = `https://${trackingDomain}/postback?clickId=${encodeURIComponent(clickId)}&payout=${encodeURIComponent(cartLineCost)}&payoutCurrencyCode=${encodeURIComponent(cartLineCostCurrency)}&ce=${eventName}`;

    fetch(url, {method: 'GET', keepalive: true}).catch(err => console.error("Skro tracking pixel error:", err));
});- Click Save and Connect this pixel with your store.
PageView event
-
Add new pixel with name: Page View Pixel
-
Copy the pixel code. You can use your own custom tracking domain and if your event name is different, then change it.
analytics.subscribe('page_viewed', (event) => {
    const urlParams = new URLSearchParams(window.location.search);
    const clickId = urlParams.get('skrocid');

    const trackingDomain = "skrotrack.com"
    const eventName = "PageView"

    if (!clickId) {
        return;
    }

    const url = `https://${trackingDomain}/postback?clickId=${encodeURIComponent(clickId)}&ce=${eventName}`;

    fetch(url, {method: 'GET',keepalive: true}).catch(err => console.error("Skro tracking pixel error:", err));
});- Click Save and Connect this pixel with your store.
ViewContent event
-
Add new pixel with name: View Content Pixel
-
Copy the pixel code. You can use your own custom tracking domain and if your event name is different, then change it.
analytics.subscribe('product_viewed', (event) => {
    const urlParams = new URLSearchParams(window.location.search);
    let clickId = urlParams.get('skrocid');

    const productTitle = event?.data?.productVariant?.product?.title || "Unknown product name";

    const trackingDomain = "skrotrack.com"
    const eventName = "ViewContent"

    function getCookie(name) {
        const value = `; ${document.cookie}`;
        const parts = value.split(`; ${name}=`);
        if (parts.length === 2) {
            return parts.pop().split(';').shift();
        }
        return null;
    }

    if (!clickId) {
        clickId = getCookie("skro-click-id") || sessionStorage.getItem("skro-click-id");
    }

    if (!clickId){
        return;
    }

    const url = `https://${trackingDomain}/postback?clickId=${encodeURIComponent(clickId)}&ce=${eventName}&p1=${encodeURIComponent(productTitle)}`;

    fetch(url, {method: 'GET',keepalive: true}).catch(err => console.error("Skro tracking pixel error:", err));
});- Click Save and Connect this pixel with your store.
Step 5. Create a Campaign in Skro
- In Skro, go to the Affiliate Networks view, click Create, select Shopify, and fill in the details.
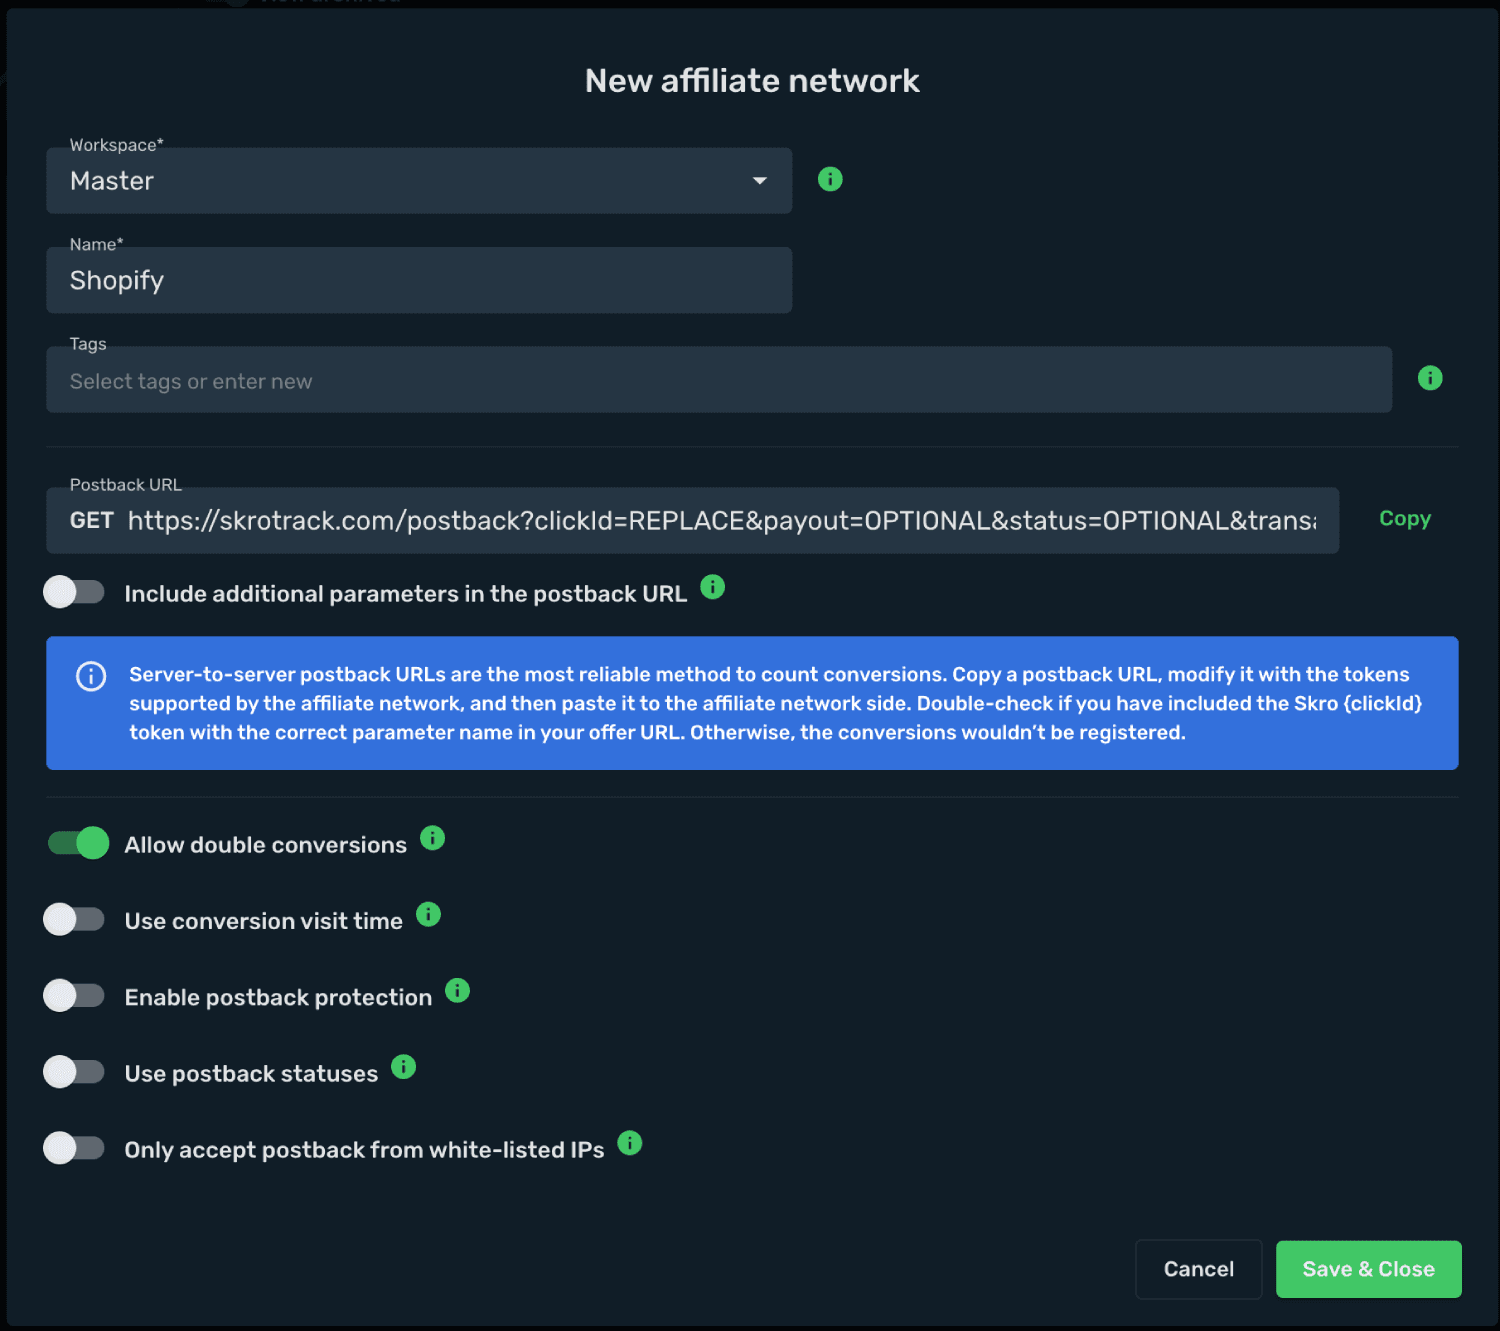
-
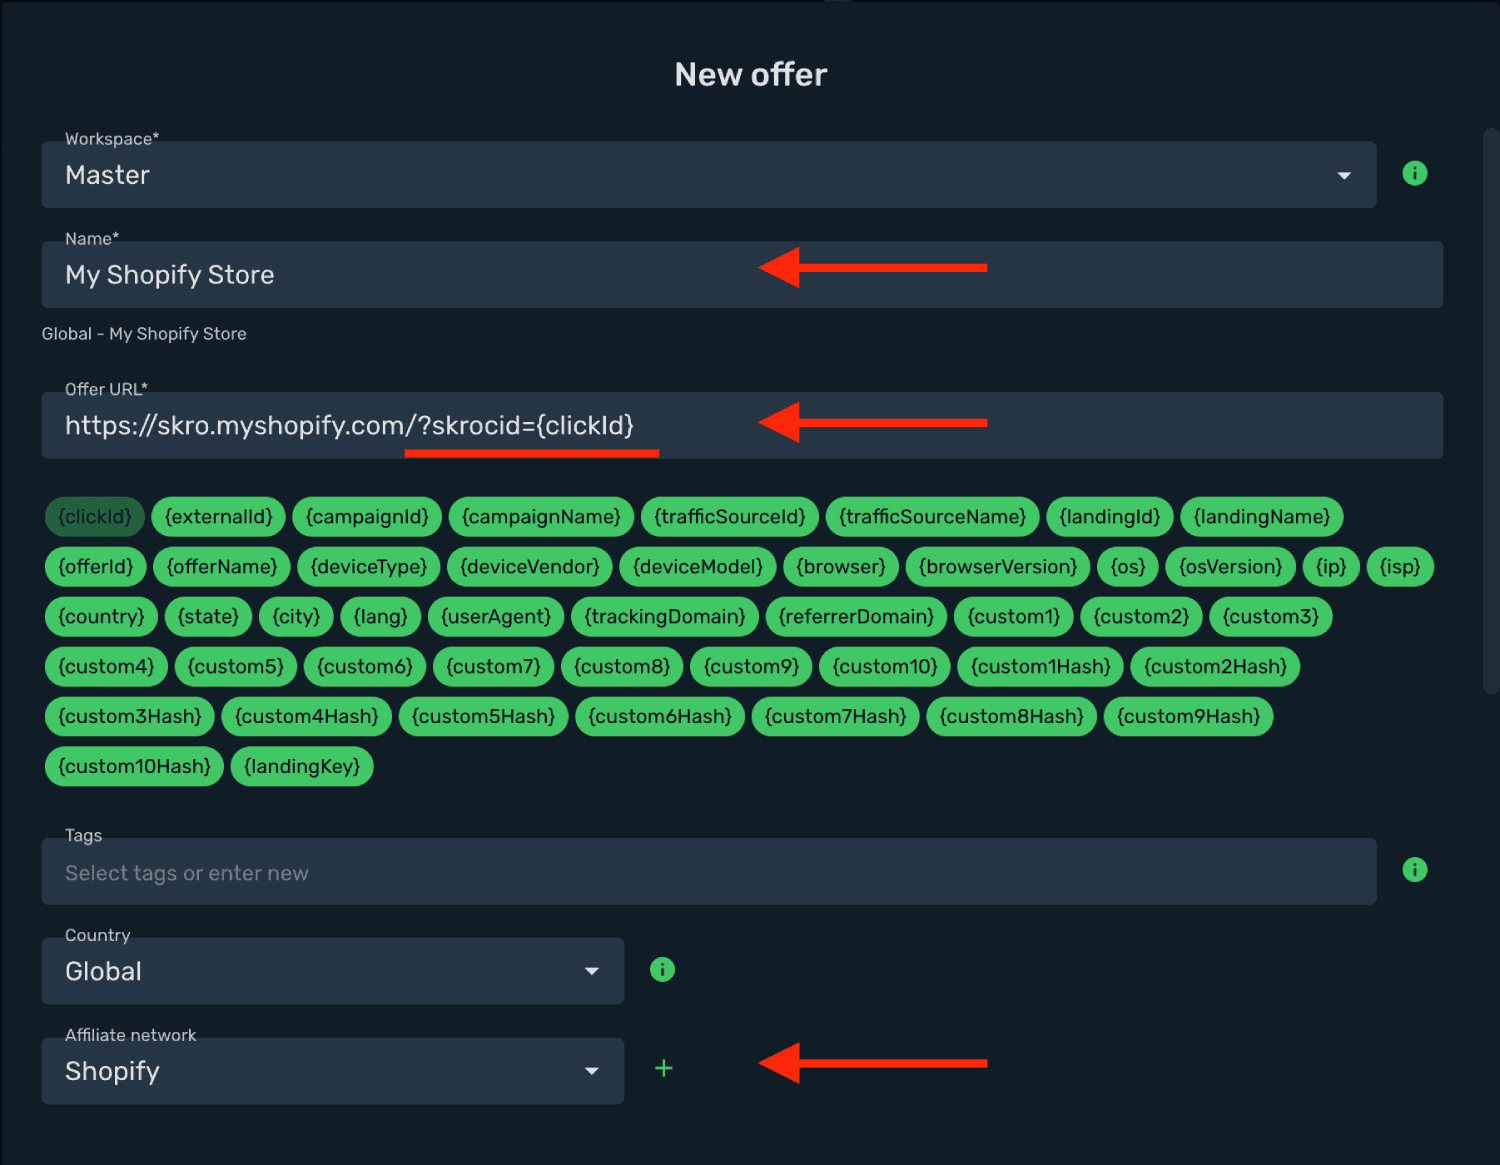
Add your store as an offer. Go to the Offers view, click Create, and enter your Shopify store details.
-
Select a workspace.
-
Enter a name for your store.
-
Enter your store URL with the Skro Click ID parameter:
?skrocid={clickId}
https://skro.myshopify.com/?skrocid={clickId}
-
Select Shopify as the affiliate network.
-
Click Save & Close.
-
(Optional) If you use a pre-lander, go to the Landings view, click Create, and add your landing page.
-
Navigate to the Ads Manager view and click Create.
-
Select your integrated Traffic Source (e.g. Facebook).
-
Select your Conversion Event Name. This must match exactly (case-sensitive) between Skro and your traffic source.
-
Select your Conversion Pixel. This is required for sending conversion data back to your traffic source.
-
Set Cost Model to Auto.
-
Select your cost currency.
-
Click Next.
-
Choose a workspace.
-
Add a descriptive campaign name.
-
Click Next.
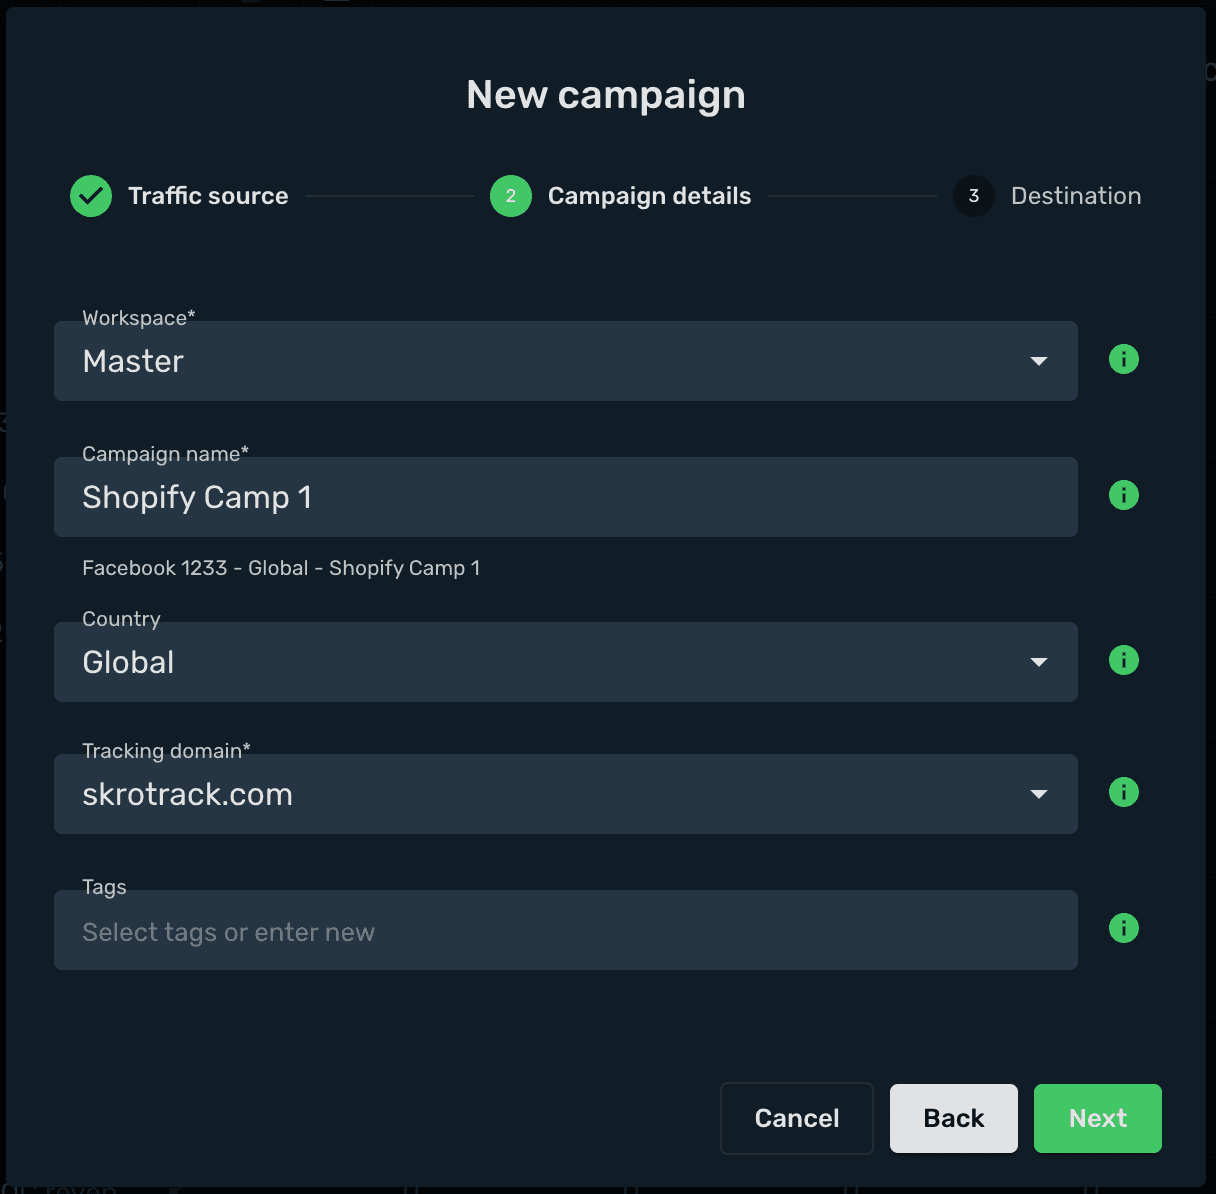
-
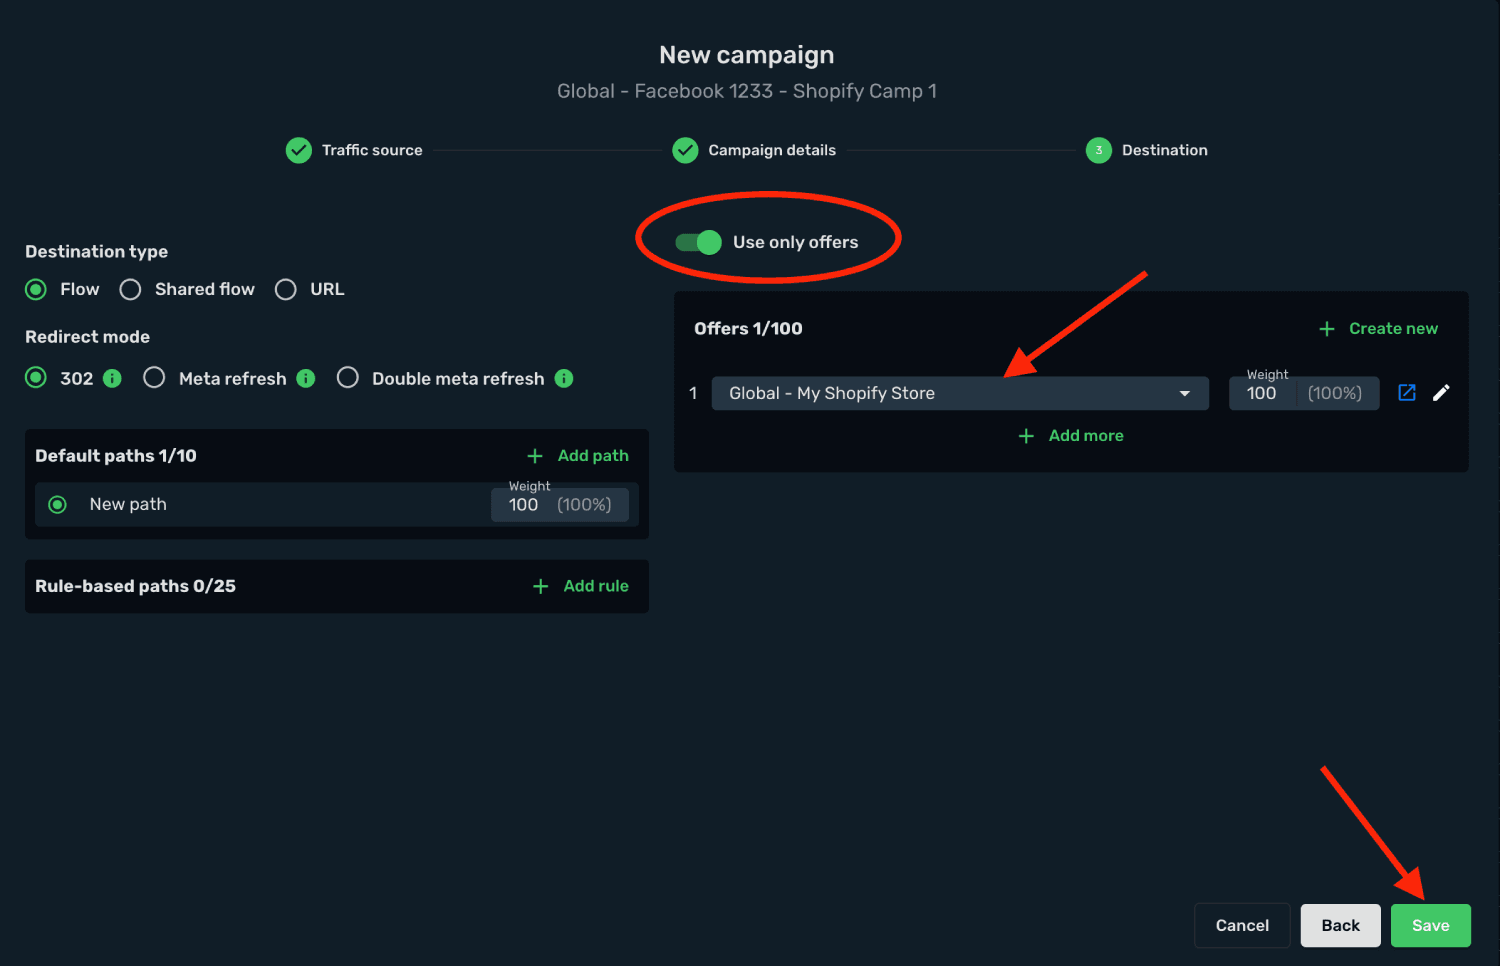
Choose your Destination Type (in this example: flow).
-
Select your redirect mode (in this example: 302 redirect).
-
Select your landing setup (in this example: use only offers).
-
Select your offer (your Shopify store).
-
Click Save.
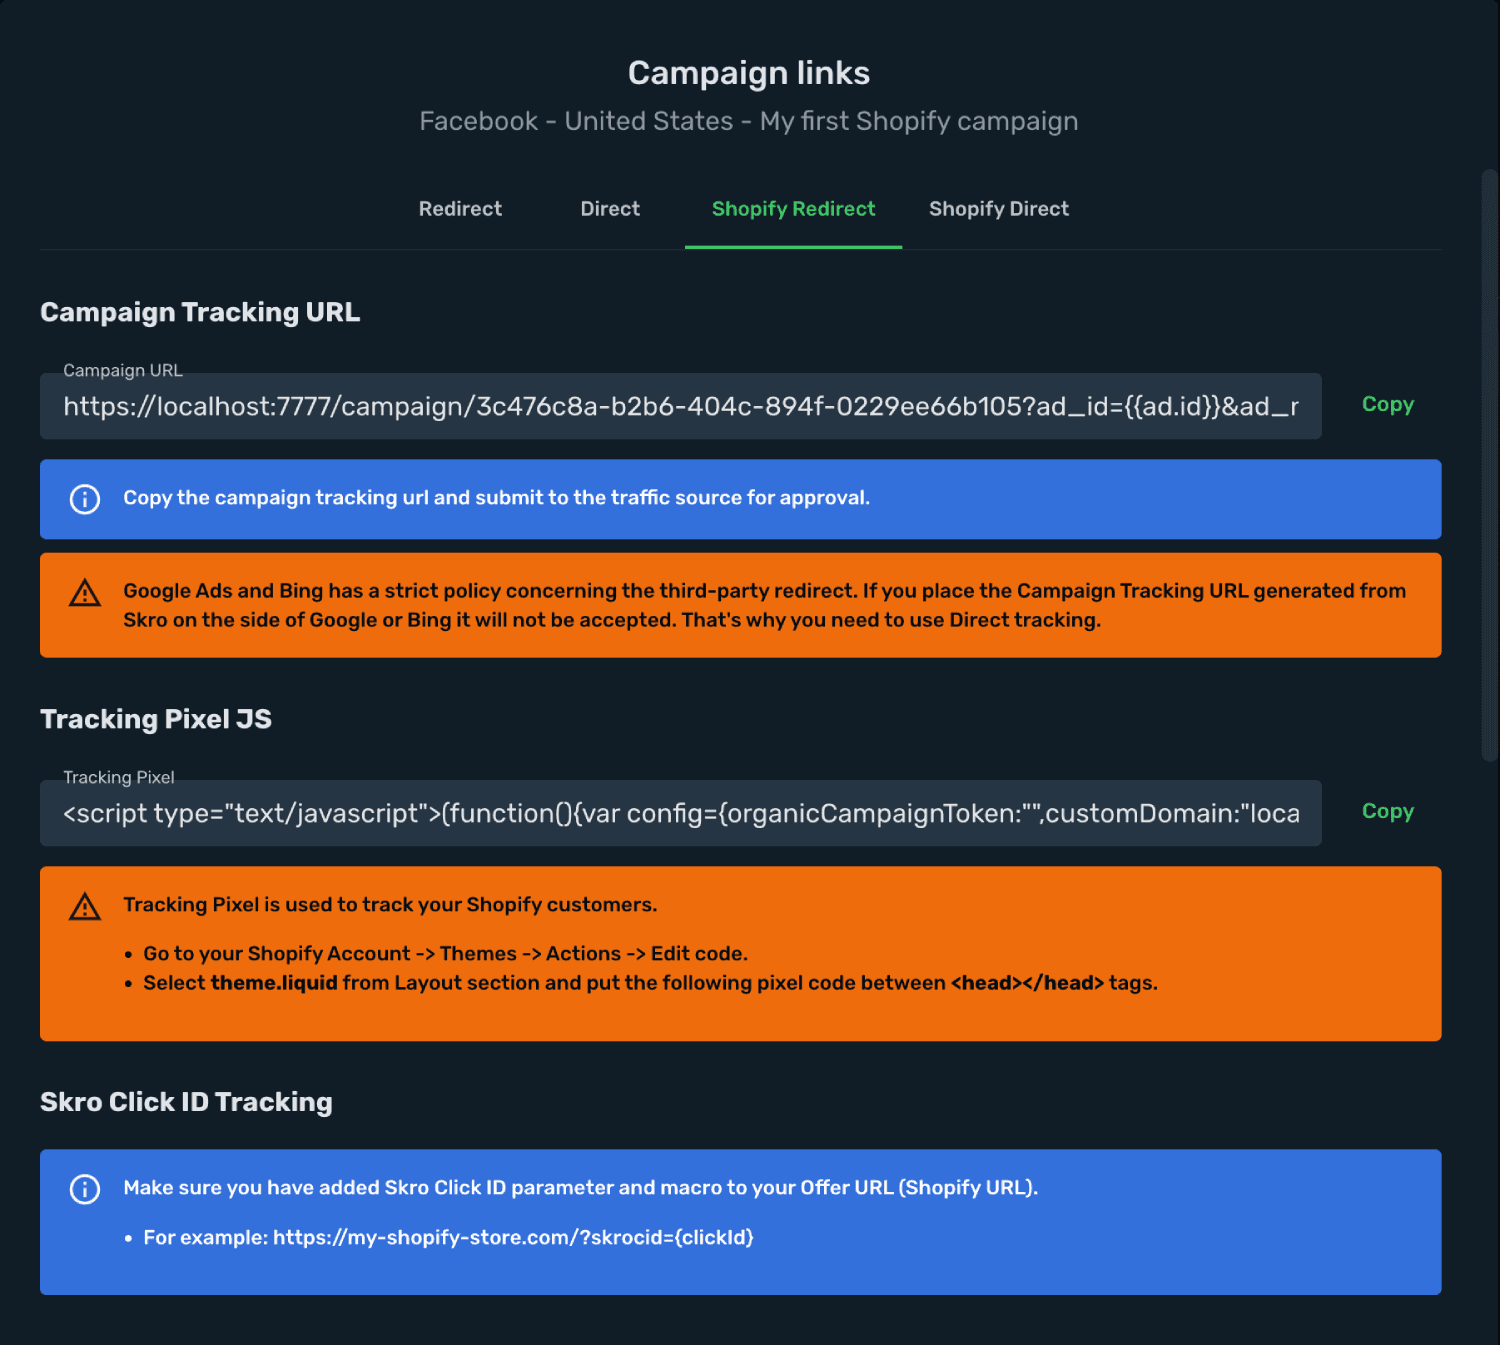
- Choose your tracking method: Shopify Redirect or Shopify Direct. (In this example we use Shopify Redirect.)
-
Copy your Skro Tracking Pixel JS and return to Shopify Admin.
-
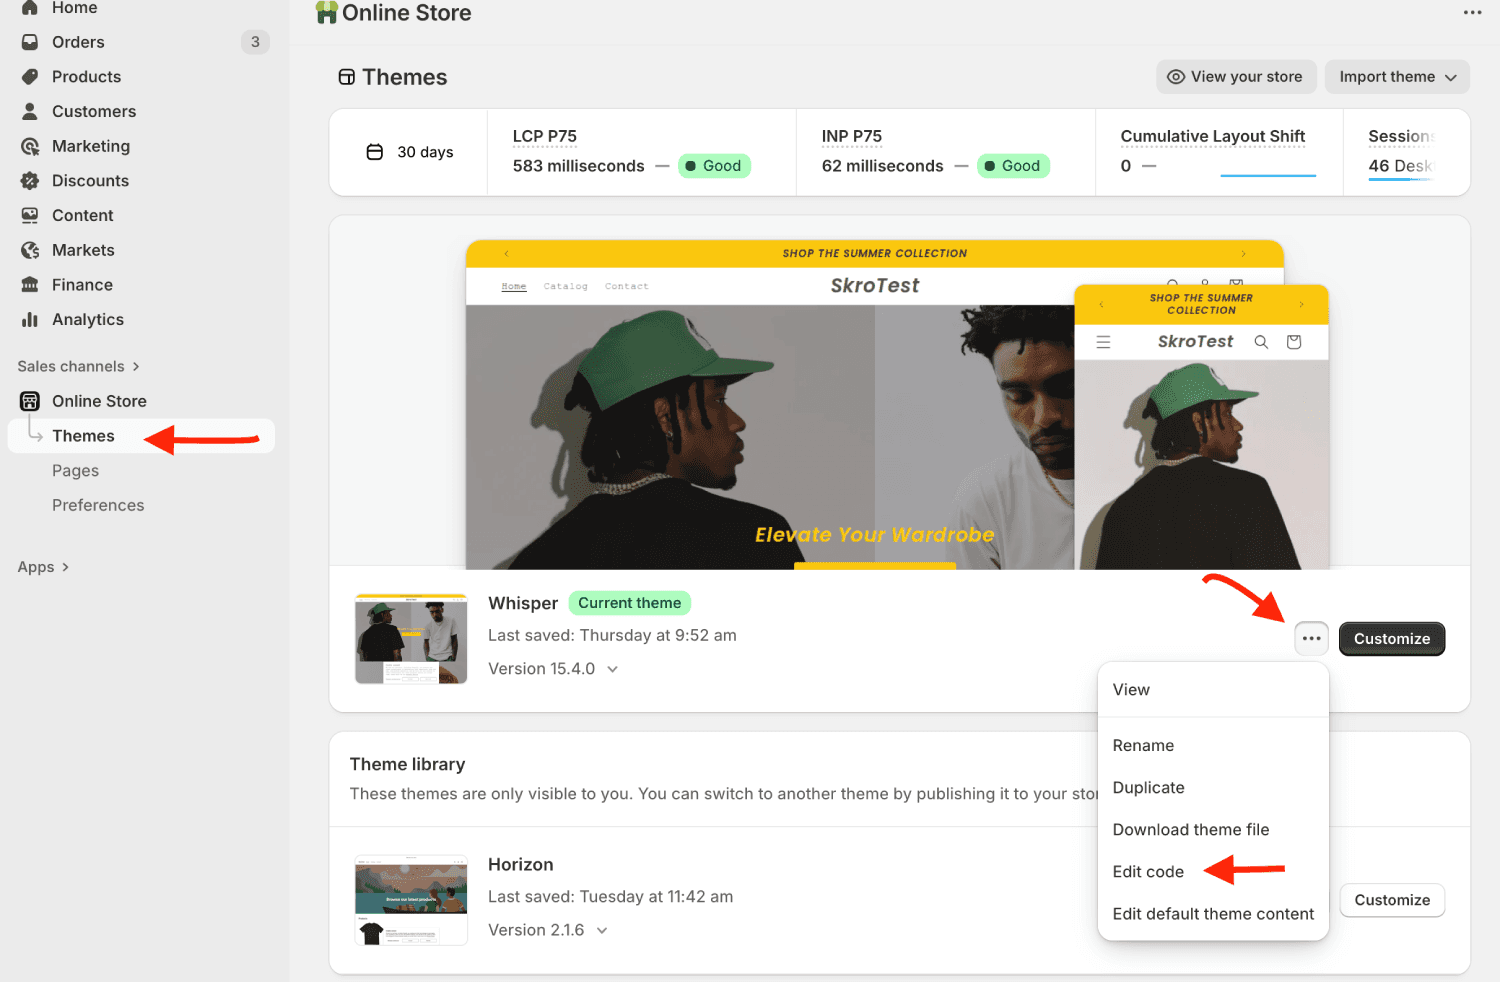
In Shopify admin, go to Themes → Actions → Edit Code.
-
Open the theme.liquid file.
-
Paste the Skro tracking pixel inside the
<head></head>section.
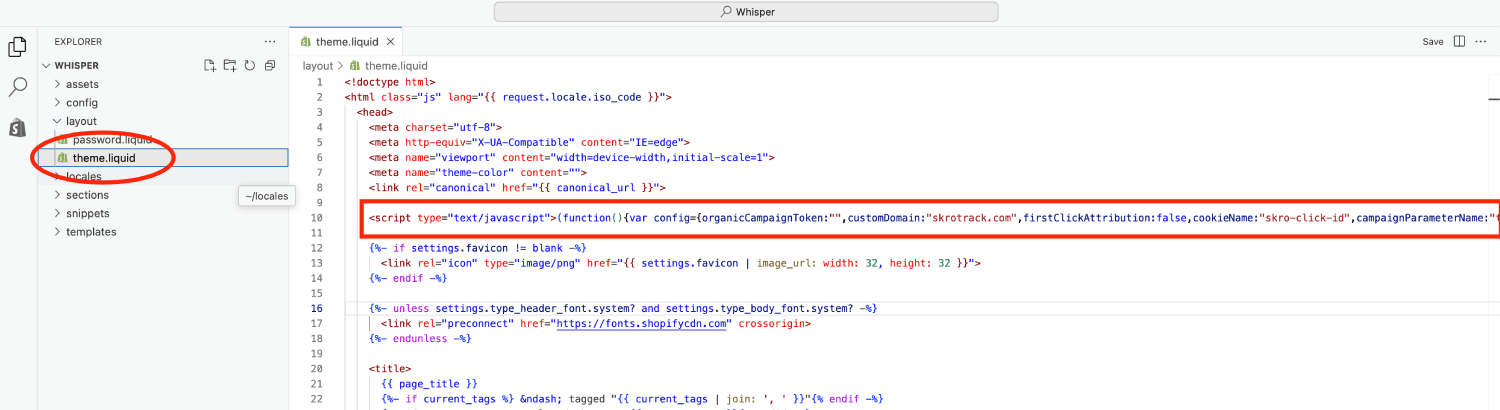
Your Shopify integration is complete! You can now use the Skro Campaign Tracking URL in Facebook Ads (or any other traffic source). Remember: all traffic must go through your Skro campaign link, otherwise the tracking will not work.
Get started with Facebook integration
Step 6. Track Shopify Organic Traffic
-
In Skro, go to Ads Manager and duplicate your existing campaign.
-
Create a new traffic source named Organic.
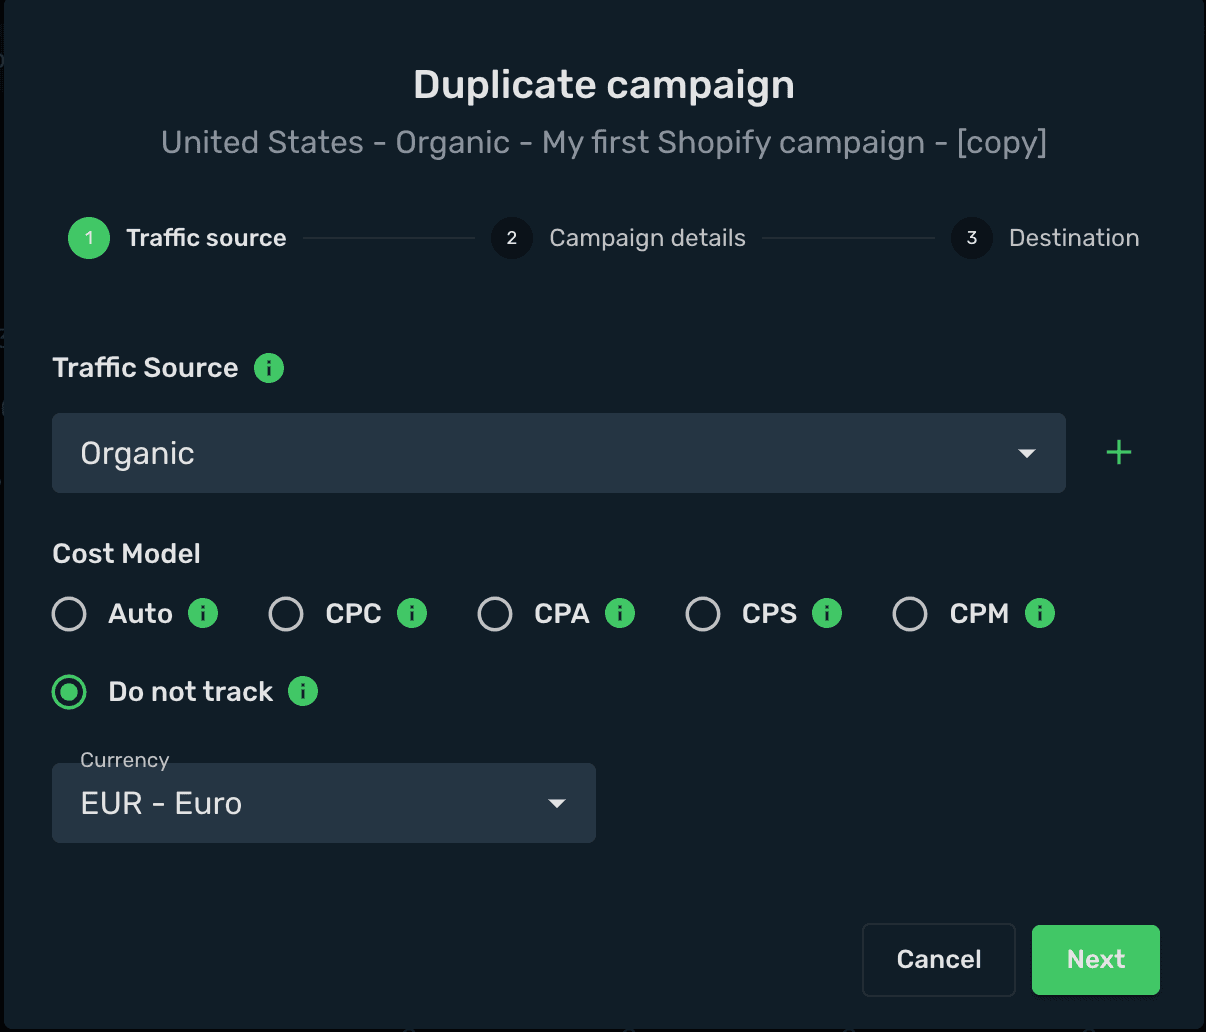
- Select your store as the offer and click Save.
- Choose Shopify Direct and select your Store from Offer URL dropdown menu.
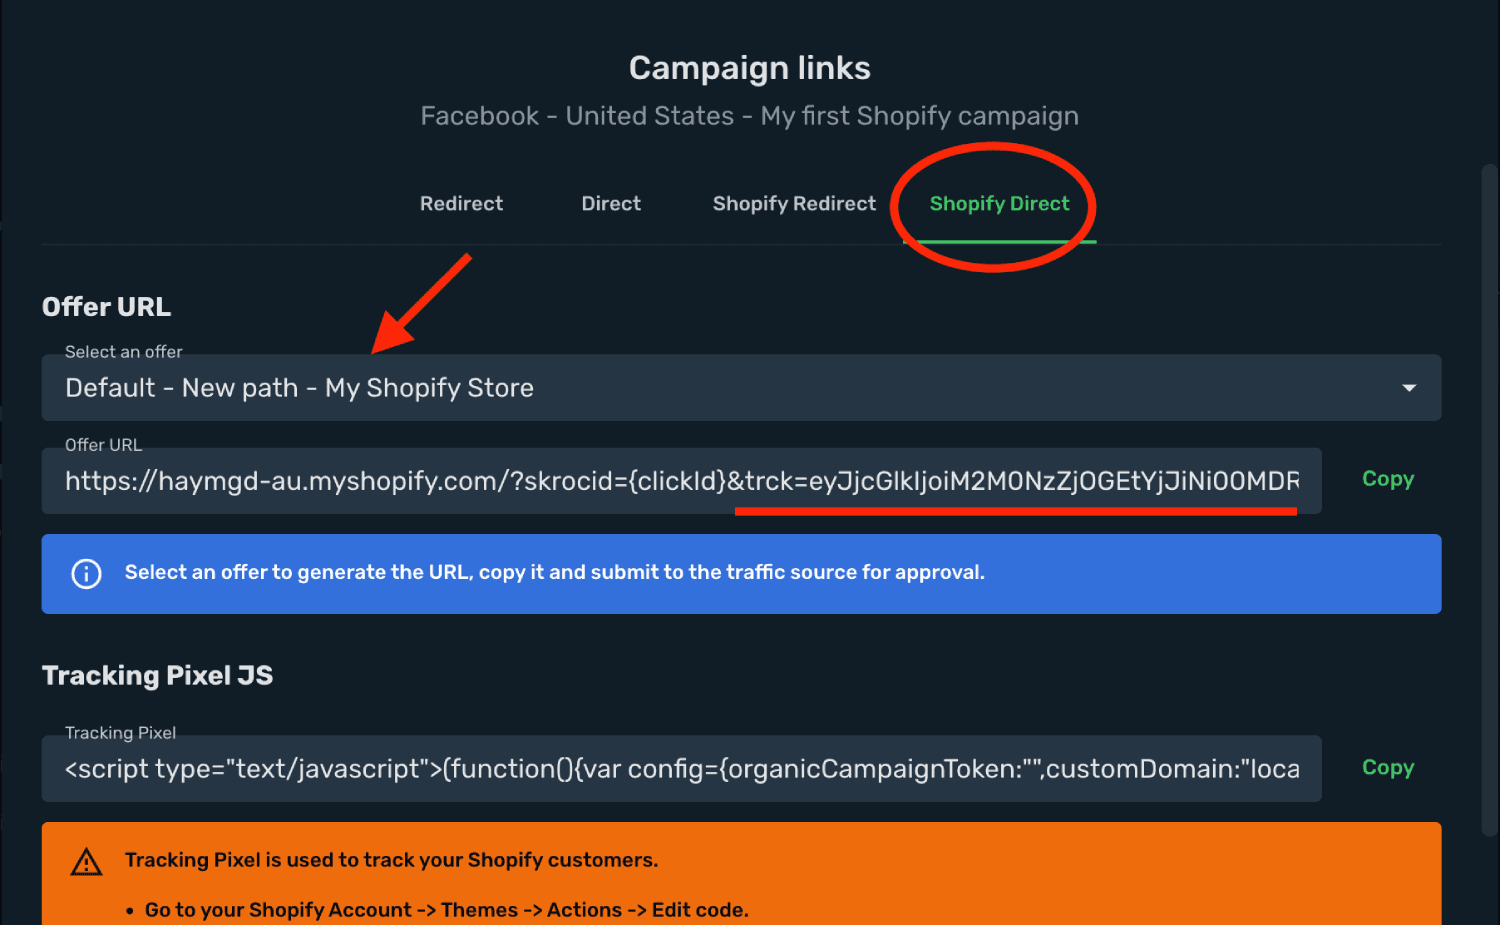
Here’s an example of a tracking link for an organic campaign:
https://skro.myshopify.com/?skrocid={clickId}&trck=eyJjcGlkIjoiM2M0NzZjOGEtYjJiNi00MDRjLTg5NGYtMDIyOWVlNjZiMTA1IiwiciI6MCwicCI6MCwibyI6MH0=&ad_id={{ad.id}}&ad_name={{ad.name}}&adset_id={{adset.id}}&adset_name={{adset.name}}&campaign_id={{campaign.id}}&campaign_name={{campaign.name}}&placement={{placement}}&site_source_name={{site_source_name}}The important part is the trck parameter value. In this example it looks like:
eyJjcGlkIjoiM2M0NzZjOGEtYjJiNi00MDRjLTg5NGYtMDIyOWVlNjZiMTA1IiwiciI6MCwicCI6MCwibyI6MH0=
-
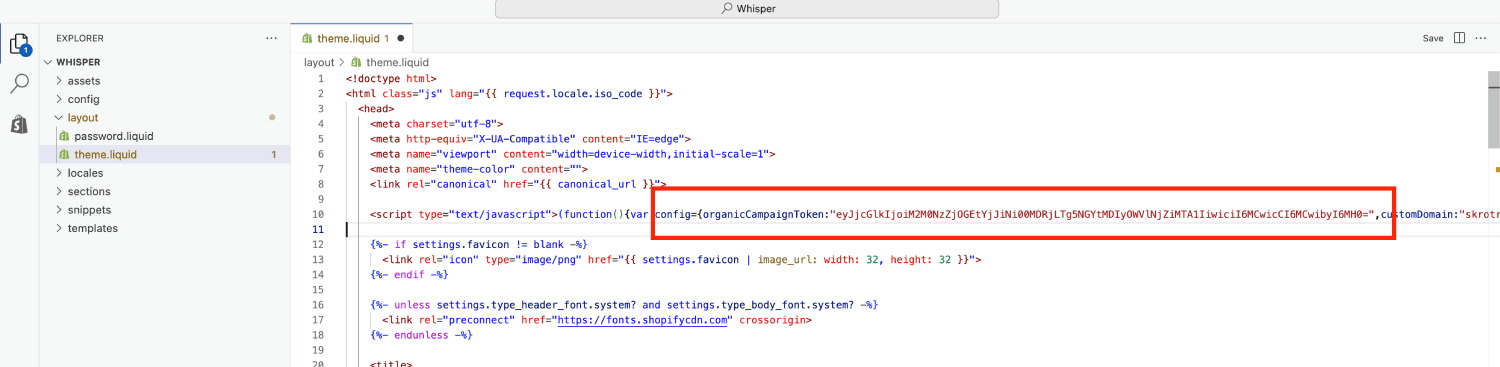
Copy this trck parameter value. Then, in your Shopify admin → Theme → Actions → Edit Code, open theme.liquid.
-
At the top of your Skro tracking pixel, find the config parameter named organicCampaignToken and paste the copied token value there.
Get started with Facebook integration
Verify the setup
Follow a campaign link and complete a test conversion using your provider’s test workflow. Confirm that the original click ID reaches the provider and is returned to Skro, then check the event and revenue in your campaign report.
Troubleshooting
If data is missing, check the selected workspace, integration, campaign, and reporting date range. Compare parameter names and macro values with the examples in this guide before repeating the test.
Related guides
Need help with this guide? Contact Skro support.